By: Team W14-4 Since: Feb 2019 Licence: MIT
1. Setting up
Go through the following sections to set up GradTrak.
1.1. Checking prerequisites
Ensure that each of the following software has been installed.
-
JDK
9or laterJDK 10on Windows will fail to run tests in headless mode due to a JavaFX bug. Windows developers are highly recommended to use JDK9. -
IntelliJ IDE
IntelliJ by default has Gradle and JavaFx plugins installed.
Do not disable them. If you have disabled them, go toFile>Settings>Pluginsto re-enable them.
1.2. Setting up the project
Follow the instructions below to set up the project on your computer.
-
Fork this repo, and clone the fork to your computer.
-
Open IntelliJ (if you are not in the welcome screen, click
File>Close Projectto close the existing project dialog first). -
Set up the correct JDK version for Gradle.
-
Click
Configure>Project Defaults>Project Structure. -
Click
New…and find the directory of the JDK.
-
-
Click
Import Project. -
Locate the
build.gradlefile and select it. ClickOK. -
Click
Open as Project. -
Click
OKto accept the default settings. -
Open a console and run the command
gradlew processResources(Mac/Linux:./gradlew processResources). It should finish with theBUILD SUCCESSFULmessage.
This will generate all resources required by the application and tests. -
Open
MainWindow.javaand check for any code errors.-
Due to an ongoing issue with some of the newer versions of IntelliJ, code errors may be detected even if the project can be built and run successfully.
-
To resolve this, place your cursor over any of the code section highlighted in red. Press ALT+ENTER, and select
Add '--add-modules=…' to module compiler optionsfor each error.
-
-
Repeat this for the test folder as well (e.g. check
HelpWindowTest.javafor code errors, and if so, resolve it the same way).
1.3. Verifying the setup
Follow the instructions below to verify that the setup is successful.
-
Run
seedu.address.MainAppand try a few commands. -
Run the tests to ensure all of them pass.
1.4. Configurating the project
Go through the following sections to configure the project.
1.4.1. Configuring the coding style
This project follows oss-generic coding standards. IntelliJ’s default style is mostly compliant with ours but it uses a different import order. Follow the instructions below to rectify this issue.
-
Go to
File>Settings…(Windows/Linux), orIntelliJ IDEA>Preferences…(macOS). -
Select
Editor>Code Style>Java. -
Click on the
Importstab to set the order.-
For
Class count to use import with '*'andNames count to use static import with '*': Set to999to prevent IntelliJ from contracting the import statements. -
For
Import Layout: The order isimport static all other imports,import java.*,import javax.*,import org.*,import com.*,import all other imports. Add a<blank line>between eachimport.
-
Optionally, you can follow the UsingCheckstyle.adoc document to configure Intellij to check style-compliance as you write code.
1.4.2. Setting up CI
Set up Travis to perform Continuous Integration (CI) for your fork. See UsingTravis.adoc to learn how to set it up.
After setting up Travis, you can optionally set up coverage reporting for your team fork (see UsingCoveralls.adoc).
| Coverage reporting could be useful for a team repository that hosts the final version but it is not that useful for your personal fork. |
Optionally, you can set up AppVeyor as a second CI (see UsingAppVeyor.adoc).
| Having both Travis and AppVeyor ensures your App works on both Unix-based platforms and Windows-based platforms (Travis is Unix-based and AppVeyor is Windows-based) |
1.4.3. Getting started with coding
Follow the instructions below when you are ready to start coding.
-
Get some sense of the overall design by reading [Design-Architecture].
-
Take a look at [GetStartedProgramming].
2. Design
The following sections explain the design of GradTrak.
2.1. Architecture
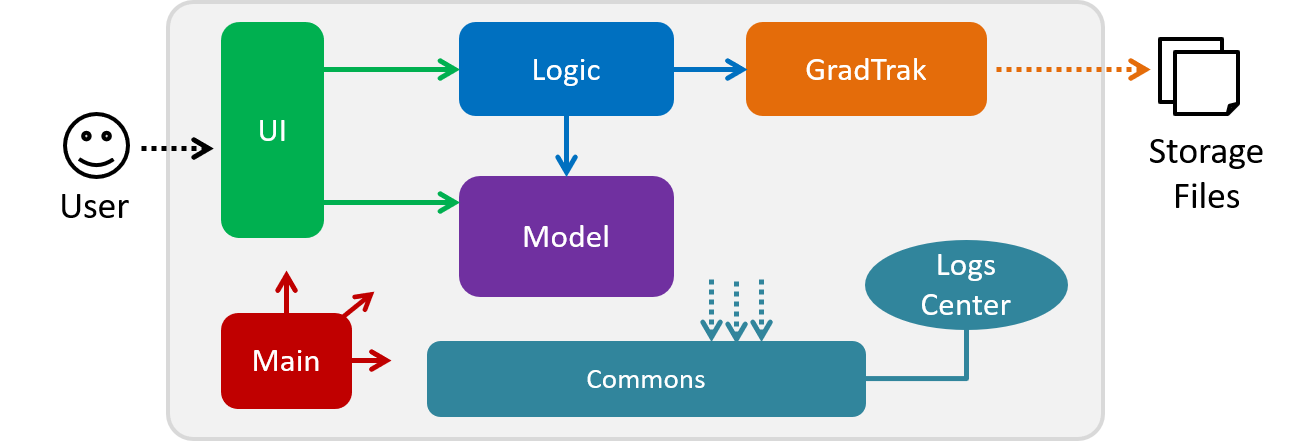
The Architecture Diagram given above explains the high-level design of the App. Given below is a quick overview of each component.
The .pptx files used to create diagrams in this document can be found in the diagrams folder. To update a diagram, modify the diagram in the pptx file, select the objects of the diagram, and choose Save as picture.
|
Main has only one class called MainApp. It is responsible for:
-
At app launch: Initializing the components in the correct sequence and connecting them with one another.
-
At shut down: Shutting down the components and invoking cleanup methods where necessary.
Commons represents a collection of classes used by multiple other components.
The following class plays an important role at the architecture level:
-
LogsCenter: Used by many classes to write log messages to the App’s log file.
The rest of the App consists of four components.
Each of the four components above:
-
Defines its Application Programming Interface (API) in an
interfacewith the same name as the Component. -
Exposes its functionality using a
{Component Name}Managerclass.
For example, the Logic component (see class diagram in Section 2.3) defines its API in the Logic.java interface and exposes its functionality using the LogicManager.java class.
How the architecture components interact with each other
The Sequence Diagram below shows how the components interact with each other for the scenario where the user issues the command delete 1.
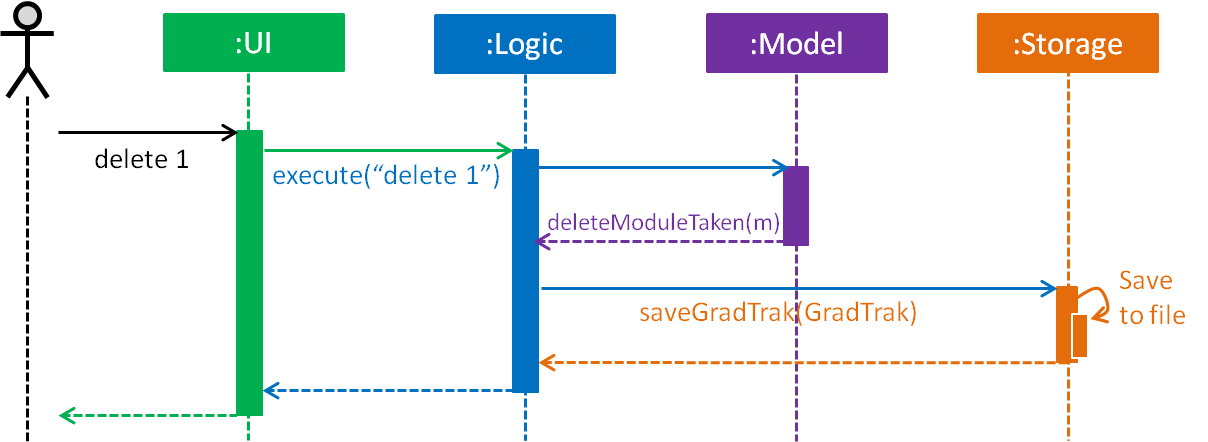
delete 1 commandThe sections below give more details of each component.
2.2. UI component
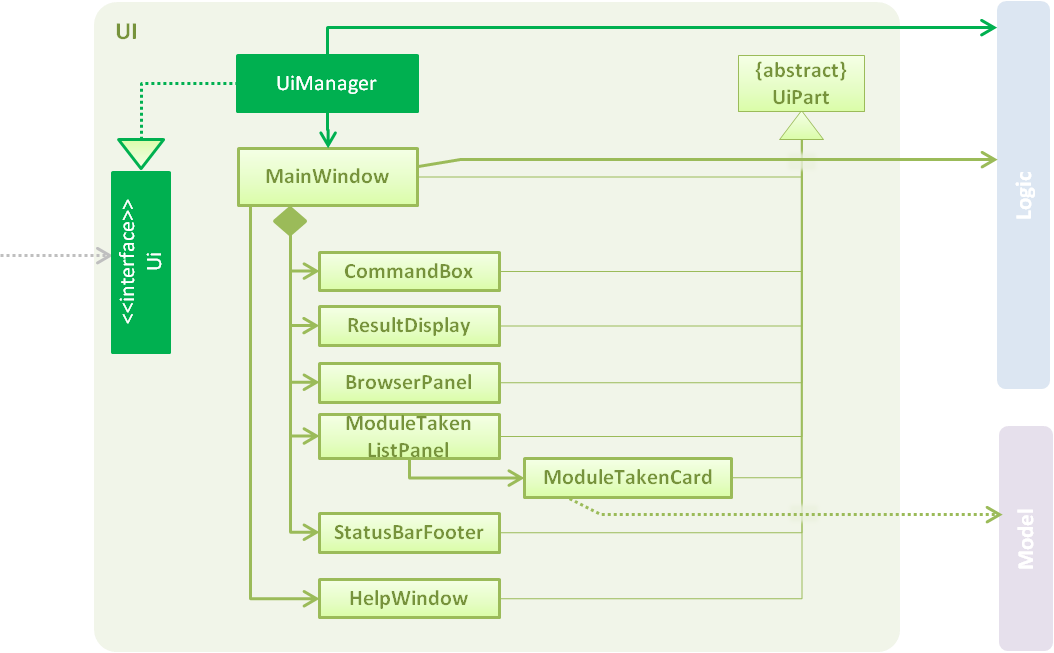
API : Ui.java
The UI consists of a MainWindow that is made up of parts e.g.CommandBox, ResultDisplay, PersonListPanel, StatusBarFooter, BrowserPanel etc. All these, including the MainWindow, inherit from the abstract UiPart class.
The UI component uses JavaFx UI framework. The layout of these UI parts are defined in matching .fxml files that are in the src/main/resources/view folder. For example, the layout of the MainWindow is specified in MainWindow.fxml
The UI component:
-
Executes user commands using the
Logiccomponent. -
Listens for changes to
Modeldata so that the UI can be updated with the modified data.
2.3. Logic component
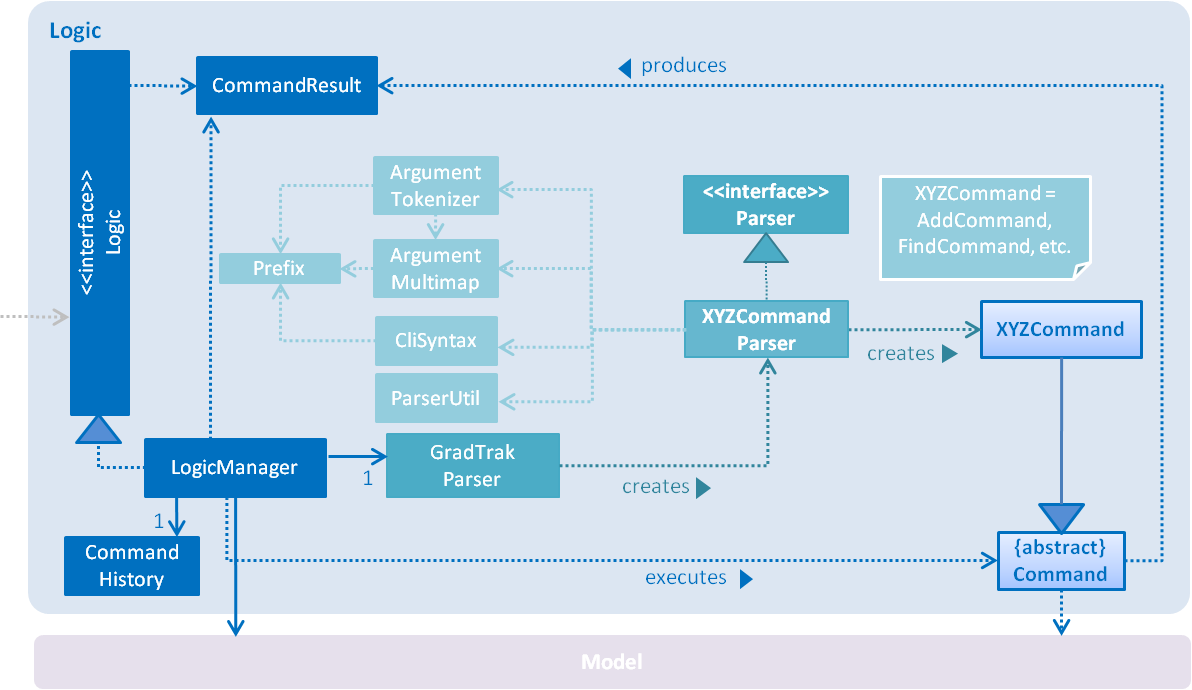
API :
Logic.java
-
Logicuses theGradTrakParserclass to parse the user command. -
This results in a
Commandobject which is executed by theLogicManager. -
The command execution can affect the
Model(e.g. adding a module). -
The result of the command execution is encapsulated as a
CommandResultobject which is passed back to theUi. -
In addition, the
CommandResultobject can also instruct theUito perform certain actions, such as displaying help to the user.
Given below is the Sequence Diagram for interactions within the Logic component for the execute("delete 1") API call.
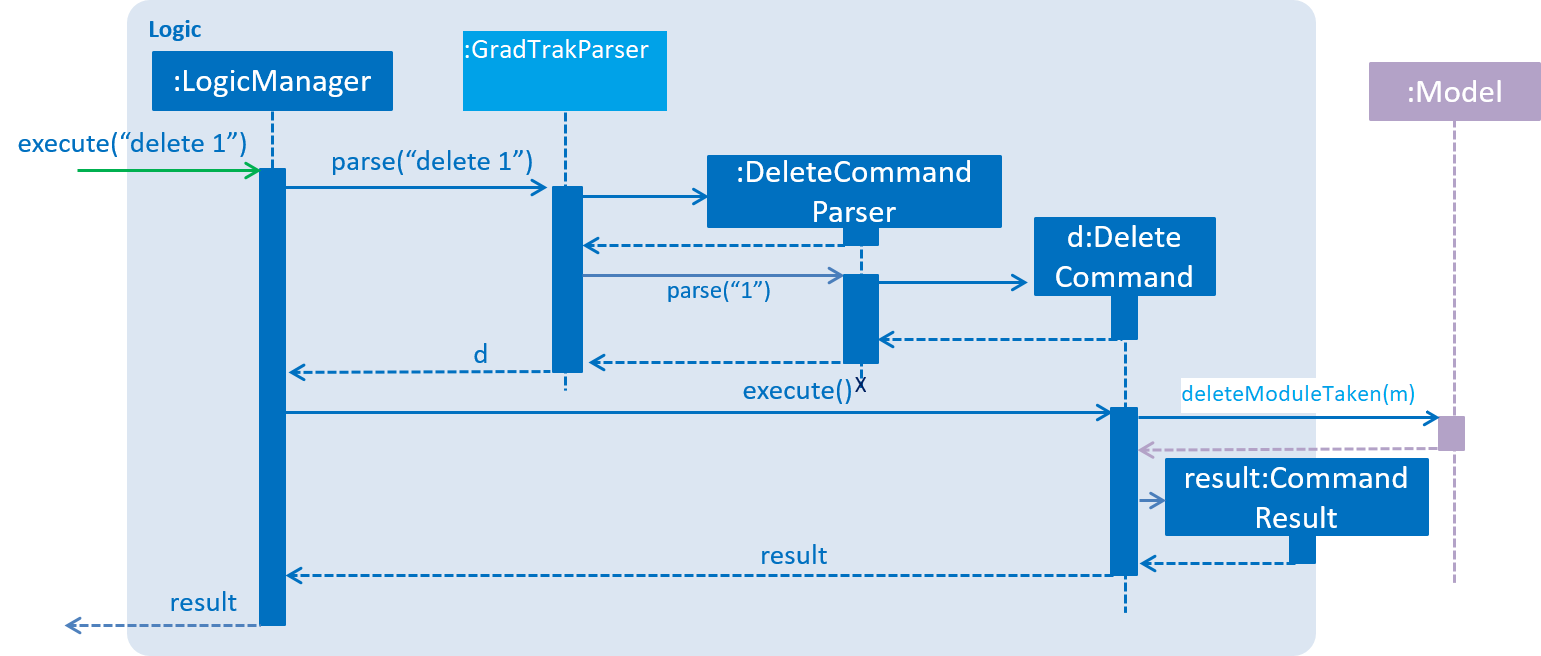
delete 1 Command2.4. Model component
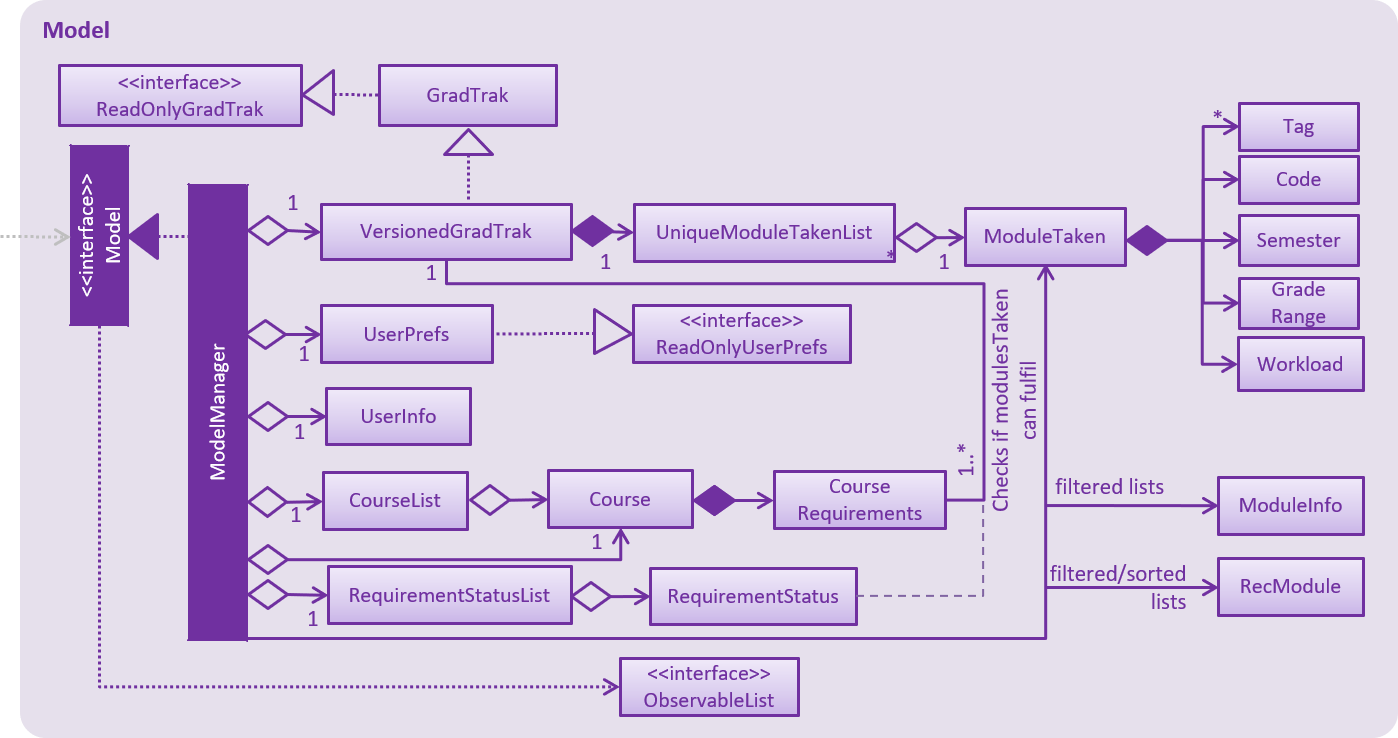
API : Model.java
The Model:
-
stores a
UserPrefobject that represents the user’s preferences. -
stores a
UserInfoobject that represents user’s information such asCourseandSemLimit -
stores the GradTrak data.
-
stores a filtered list of
ModuleInfo,RecModulethat represents a list of modules NUS offers -
stores a list of
RequirementStatusthat keep tracks of the status of eachCourseRequirementof theCourse. -
exposes an unmodifiable
ObservableList<ModuleTaken>that can be 'observed' e.g. the UI can be bound to this list so that the UI automatically updates when the data in the list change. -
does not depend on any of the other three components.
As a more OOP model, we can store a Tag list in GradTrak, which ModuleTaken can reference. This would allow GradTrak to only require one Tag object per unique Tag, instead of each ModuleTaken needing their own Tag object. An example of how such a model may look like is given below.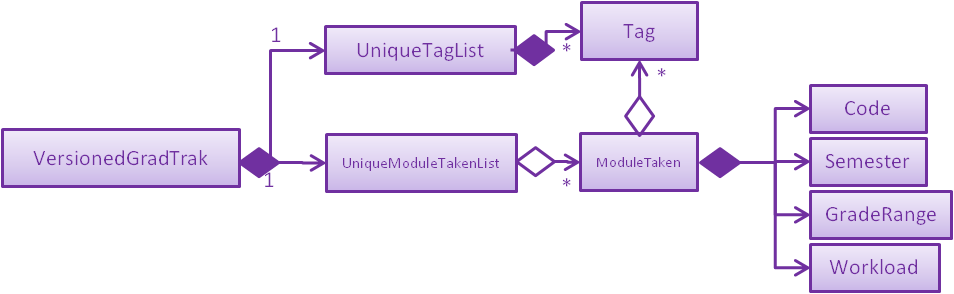
|
2.5. Storage component
Within the Storage component there are 2 types of storage classes:
1. read and write storage
2. read only storage
2.5.1. Read and write storage
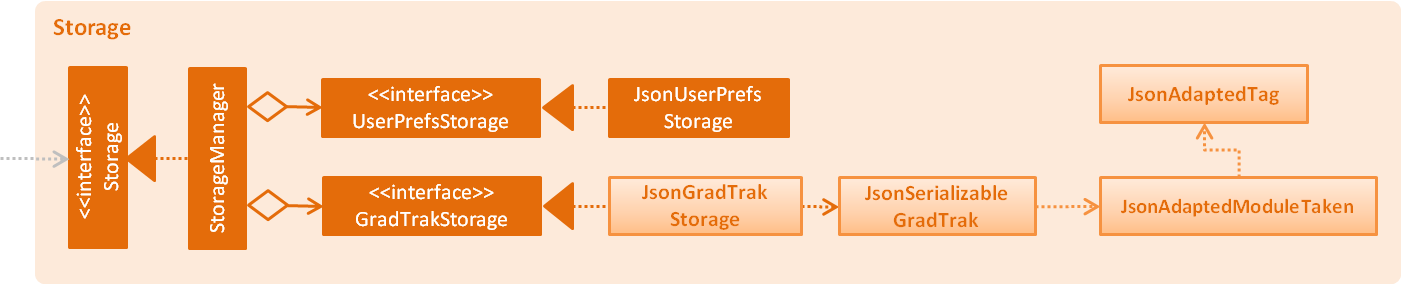
API : Storage.java
The Storage component,
-
can save
UserPref,UserInfoobjects in json format and read it back. -
can save the GradTrak data in json format and read it back.
2.5.2. Read-only storage
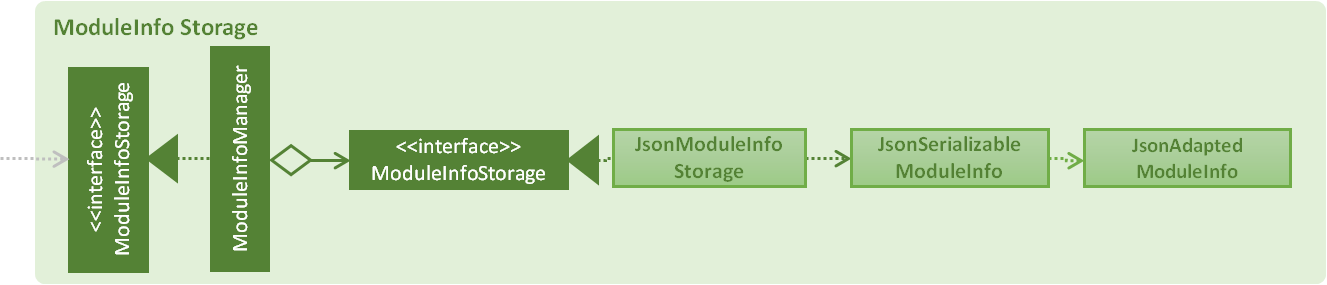
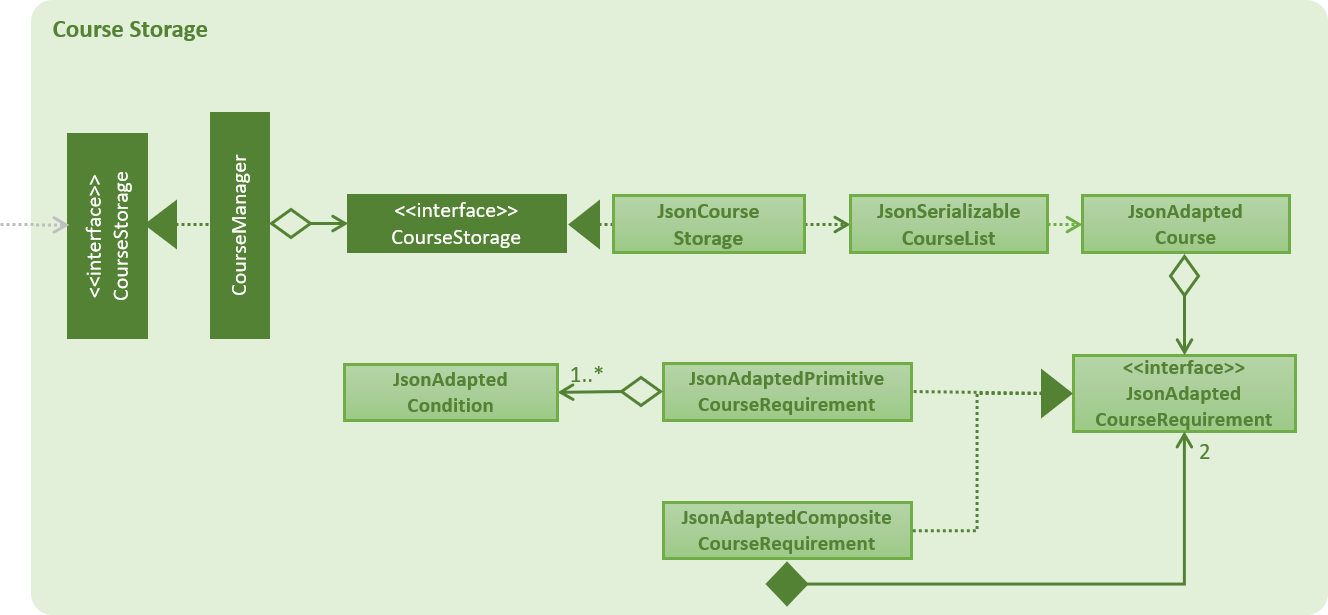
-
loads
ModuleInfoStorageandCourseStoragefrom json format into memory
2.6. Common classes
Classes used by multiple components are in the seedu.addressbook.commons package.
3. Implementation
This section describes some noteworthy details on how certain features are implemented.
3.1. Displaymod feature
3.1.1. Current implementation
displaymod is a command that displays the information of a module based on the search by the student. The main reason for implementing
such a feature is so that students can have immediate access to all available modules in NUS instead of searching through the
internet.
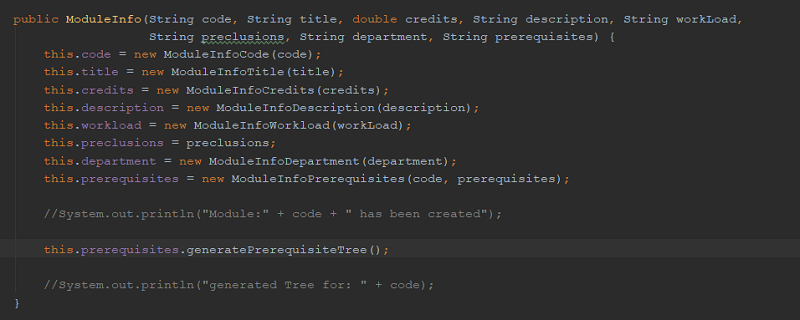
3.1.2. Creation of ModuleInfo
Most of the processing of this feature is done during the launch of the application. The modules are created as a object
called ModuleInfo. These objects only contain vital information of a particular module and nothing else. This to ensure that
only information relevant students are displayed. This process is done with aid of the Storage class, to be more exact
it uses [Read-Only] extracting all the data from allModule.Json file found in the resources folder.
The figure below shows the class diagram for ModuleInfo :
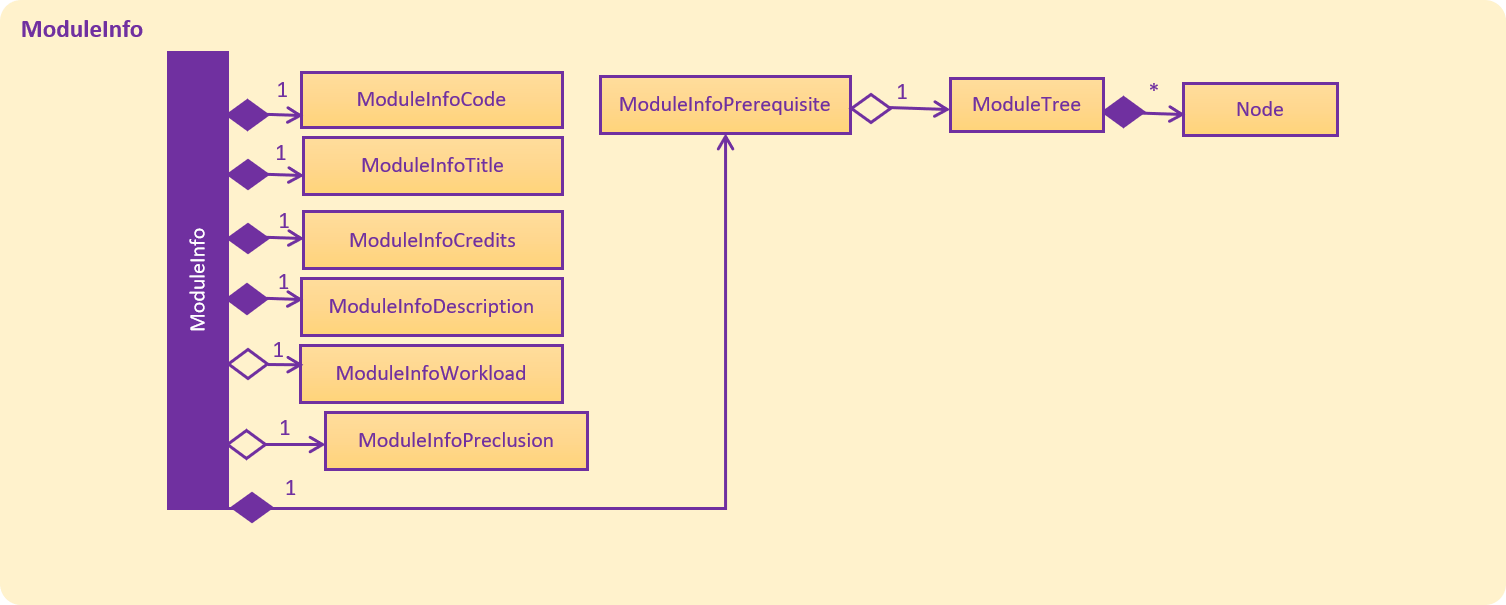
As seen from above the ModuleInfo class is made up of 8 other classes:
|
|
|
|
|
|
|
|
The information found in the modules are separated into their own class to maintain modularity in the
code. All of these objects are created in the construction of the ModuleInfo Object.
3.1.3. Generating prerequisite trees
Within the ModuleInfo class, the ModuleInfoPrerequisite class requires the most pre-processing. If a student wishes to take
a particular module, they have to check if they can satisfy the prerequisites, thus presenting the prerequisite tree is
paramount to the ModuleInfo class.
ModuleInfoPrerequisite contains a custom data structure called ModuleTree which can be found in the
commons.Util package. It was place in the commons package since it was a data structure and other functions
or feature may require the ModuleTree i.e. when adding/deleting modules from the ModuleTaken list of the student.
The ModuleTree data structure consist of "smaller" objects called Node, which can also be found in commons.Util.
Node can represent one of the following information:
1. Head : The head/root of the ModuleTree which holds a value of the module code of the "larger" ModuleInfo object.
2. Operator : Either "OR" or "AND" to indicate if only one of the module is required to fulfill the prerequisite or
all of the listed modules are required respectively.
3. Module Code : The module code that is required to meet the prerequisite.

The generatePrerequisiteTree() function is called after the ModuleInfoPrerequisite object has been created, since
the ModuleTree is dependent on the String input prereq which later be saved as prerequisiteString.
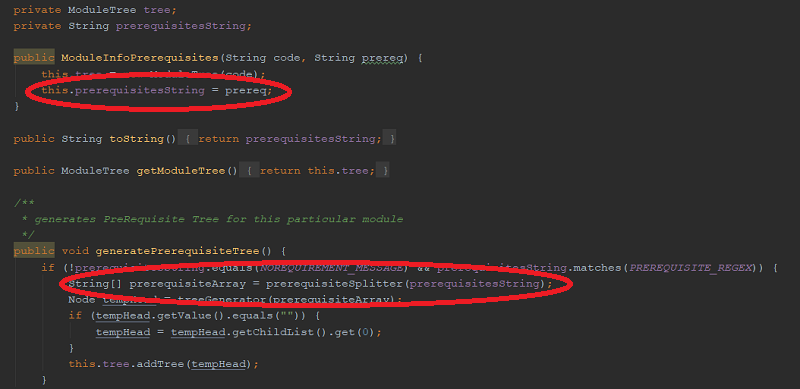
The input prerequisite usually comes in the format:
"Prerequisite":"[MA1312 or MA1521 or MA1505 or (MA1511 and MA1512)] and [ST2334 or ST2131 or ST2132] and [IS3106 or BT3103]"
The input value is then split into an array using regular expressions:
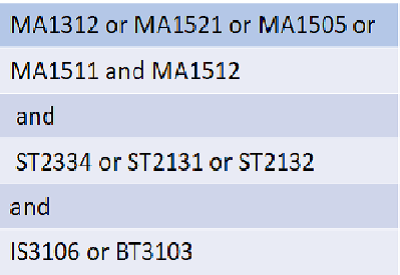
This helps with the arrangement of the ModuleTree as shown below:
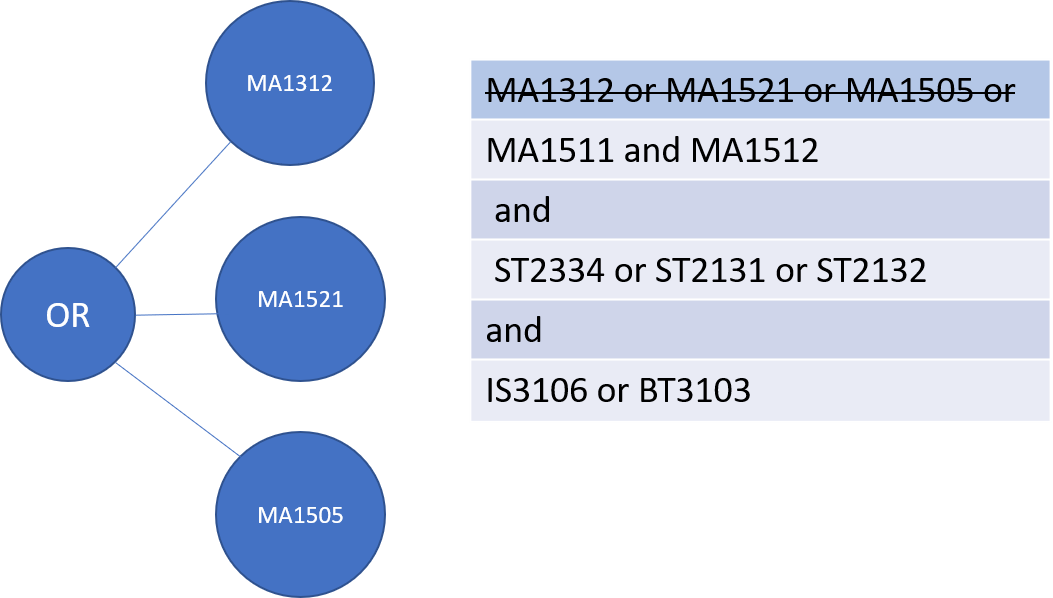
String is used to create a minor tree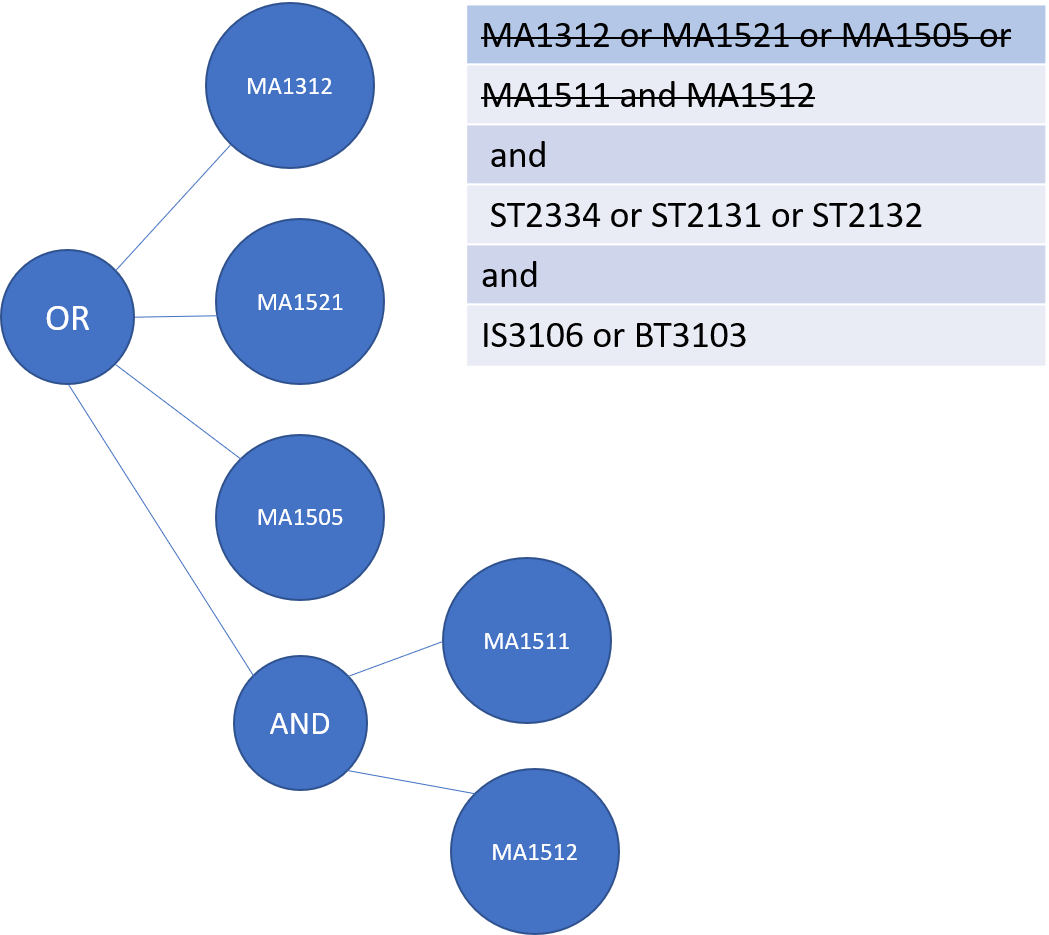
String ended with a "OR" the next String is made and added as a child to the predecessor.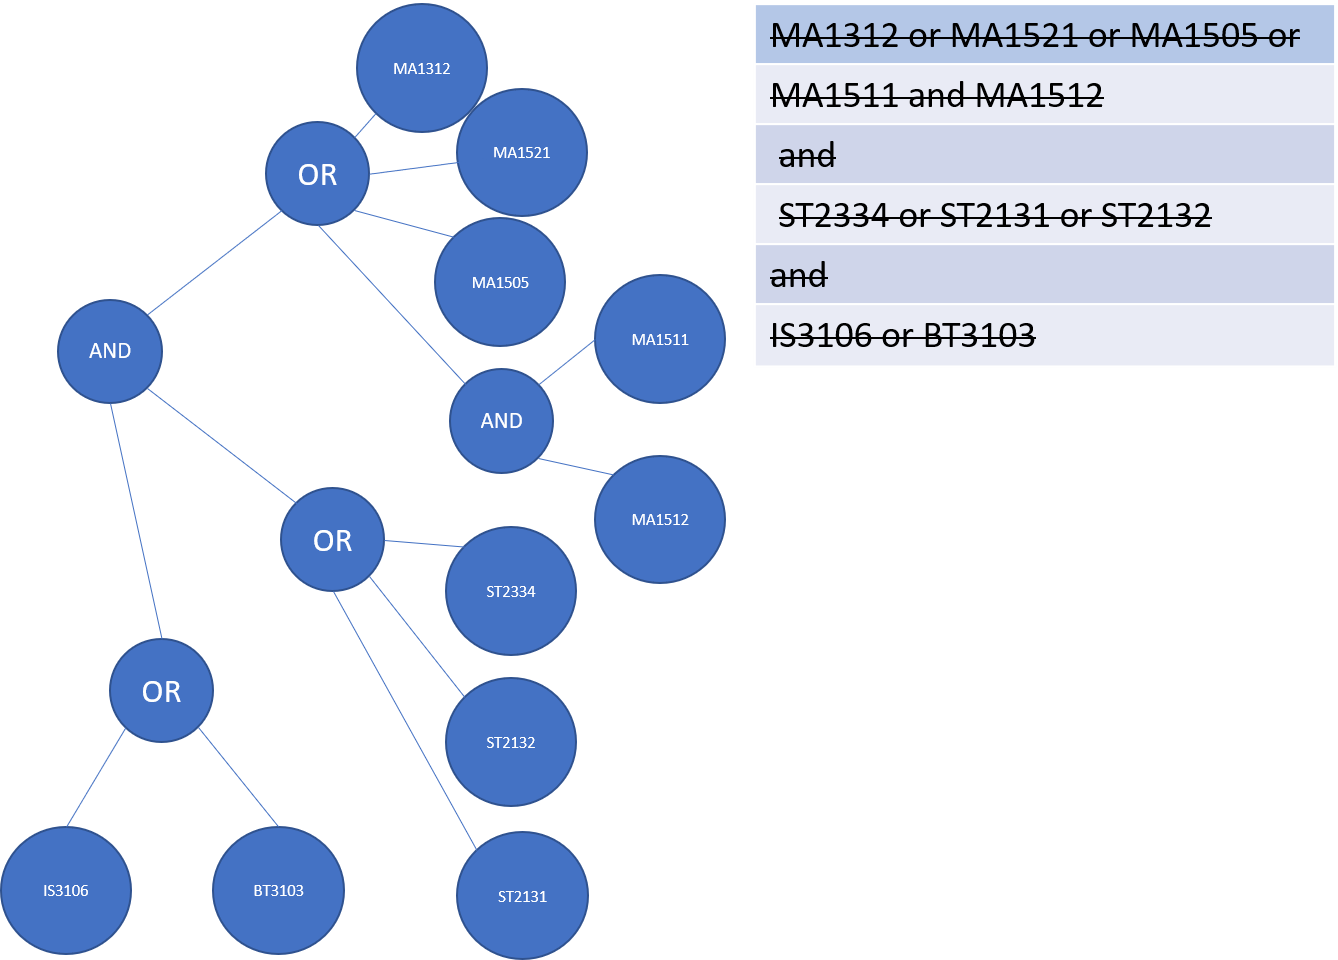
3.1.4. Making it into a list
The final part of this entire process is storing all the ModuleInfo objects into a list. Currently, we did this using
an ObservableList<>, this is done so that we can take advantage of the FilteredList<> class by filtering the list using
Predicates.
During initial launch, after each module’s information is converted into a ModuleInfo object, it will be added to a
ModuleInfoList object which contains an ArrayList<ModuleInfo>. After all the modules are added into ModuleInfoList,
ModuleInfoList will be passed into ModelManager and will be converted into an ObservableList<> called allModules.
Following that, a FilteredList<> object called displaylist will also be constructed from the allModules ObservableList<>.

Whenever the student searches for a particular ModuleInfo , the ObservableList<> is always ready and the FilteredList<>
will be updated using a Predicate List generated from the keywords searched by the student.

3.1.5. Design considerations
Aspect: ModuleTree data structure
-
Current implementation : Custom Module tree data structure
-
Pros: Able to handle "AND" or "OR" operations found in the prerequisite Tree.
-
Cons: Takes a extremely long time to implement and design. Not to mention extremely error-prone.
-
-
Alternative considered : Use a current
JDKTreedata structure-
Pros: Easy to deploy into current code base.
-
Cons: Unable to deal with special operations like "AND" or "OR".
-
3.1.6. Aspect: Storing ModuleInfo objects in an ObservableList<>
-
Current Implementation :
ObservableList<>is used-
Pros: Allows for
FilteredList<>to be used based on predicates; easy implementation. -
Cons: Requires additional classes to be implemented to handle the use of
Predicates.
-
-
Alternative considered: Sticking to
ArrayList<>-
Pros: Easy to handle as it is a simple data structure.
-
Cons: Harder to search for
ModuleInfoobjects based on codes and keywords.
-
3.2. Undo/Redo feature
3.2.1. Current Implementation
The undo/redo mechanism is facilitated by VersionedGradTrak.
It extends GradTrak with an undo/redo history, stored internally as an gradTrakStateList and currentStatePointer.
Additionally, it implements the following operations:
-
VersionedGradTrak#commit()— Saves the current GradTrak state in its history. -
VersionedGradTrak#undo()— Restores the previous GradTrak state from its history. -
VersionedGradTrak#redo()— Restores a previously undone GradTrak state from its history.
These operations are exposed in the Model interface as Model#commitGradTrak(), Model#undoGradTrak() and Model#redoGradTrak() respectively.
Given below is an example usage scenario and how the undo/redo mechanism behaves at each step.
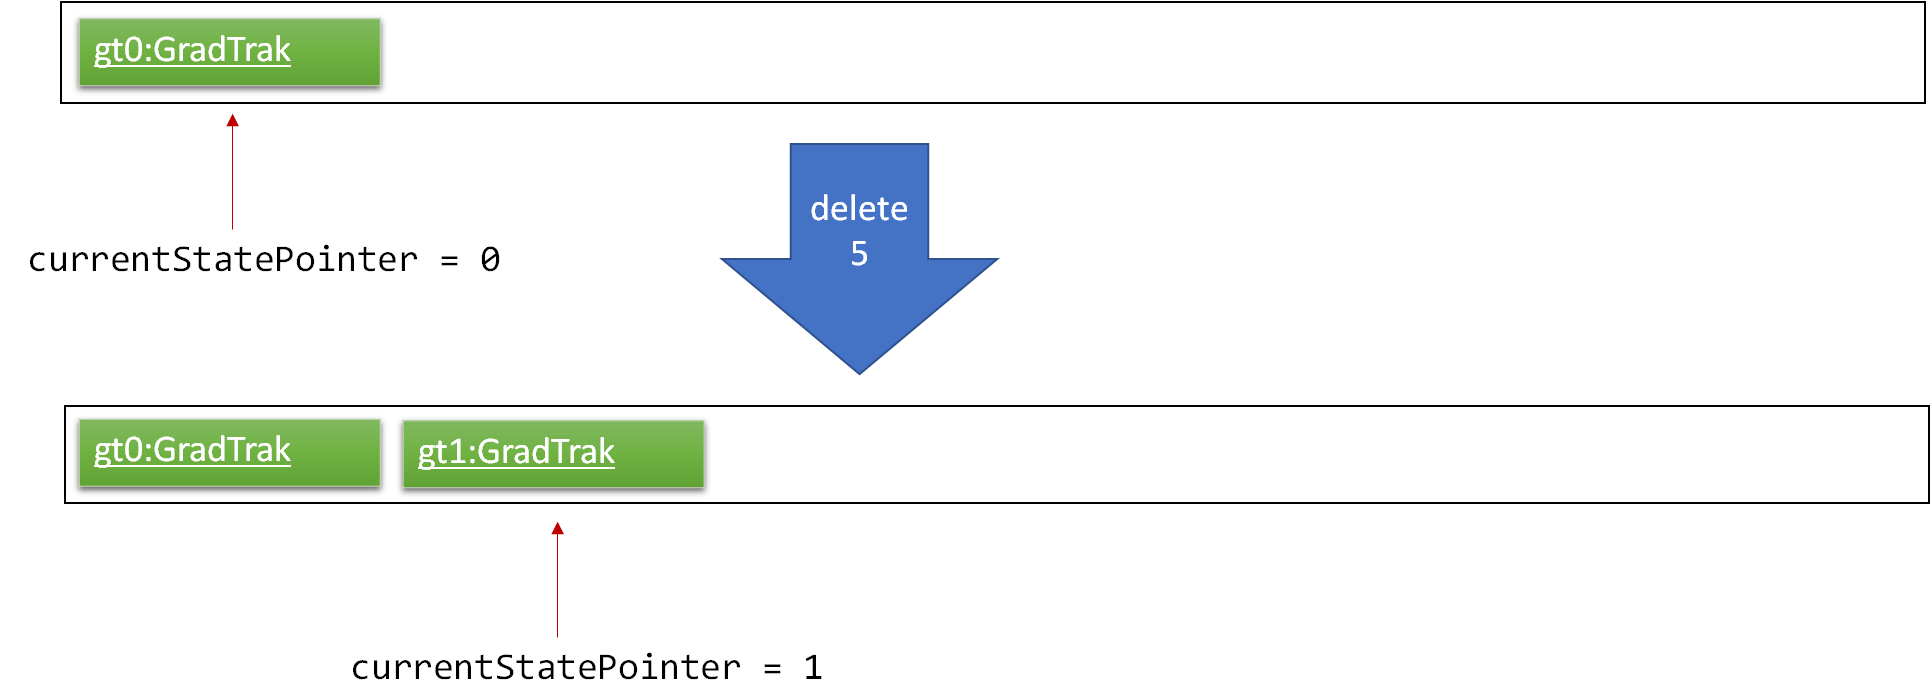
Step 1. The student launches the application for the first time. The VersionedGradTrak will be initialized with the initial GradTrak state, and the currentStatePointer pointing to that single GradTrak state.

Step 2. The student executes delete 5 command to delete the 5th module in the GradTrak. The delete command calls Model#commitGradTrak(), causing the modified state of the GradTrak after the delete 5 command executes to be saved in the GradTrakStateList, and the currentStatePointer is shifted to the newly inserted GradTrak state.
Step 3. The student executes add c/CS2103T … to add a new module. The add command also calls Model#commitGradTrak(), causing another modified GradTrak state to be saved into the gradTrakStateList.
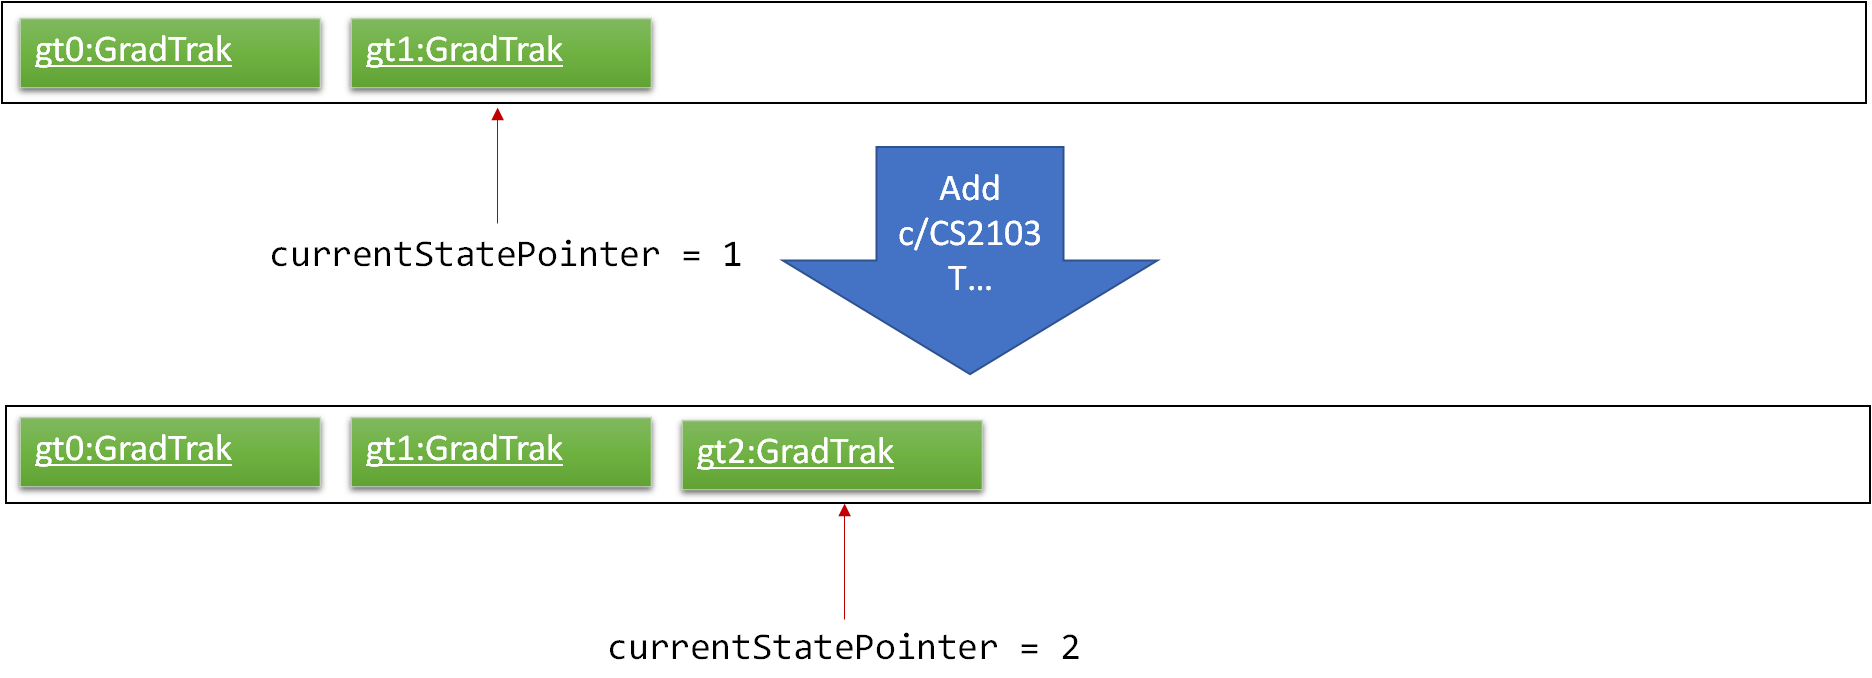
If a command fails its execution, it will not call Model#commitGradTrak(), so the GradTrak state will not be saved into the gradTrakStateList.
|
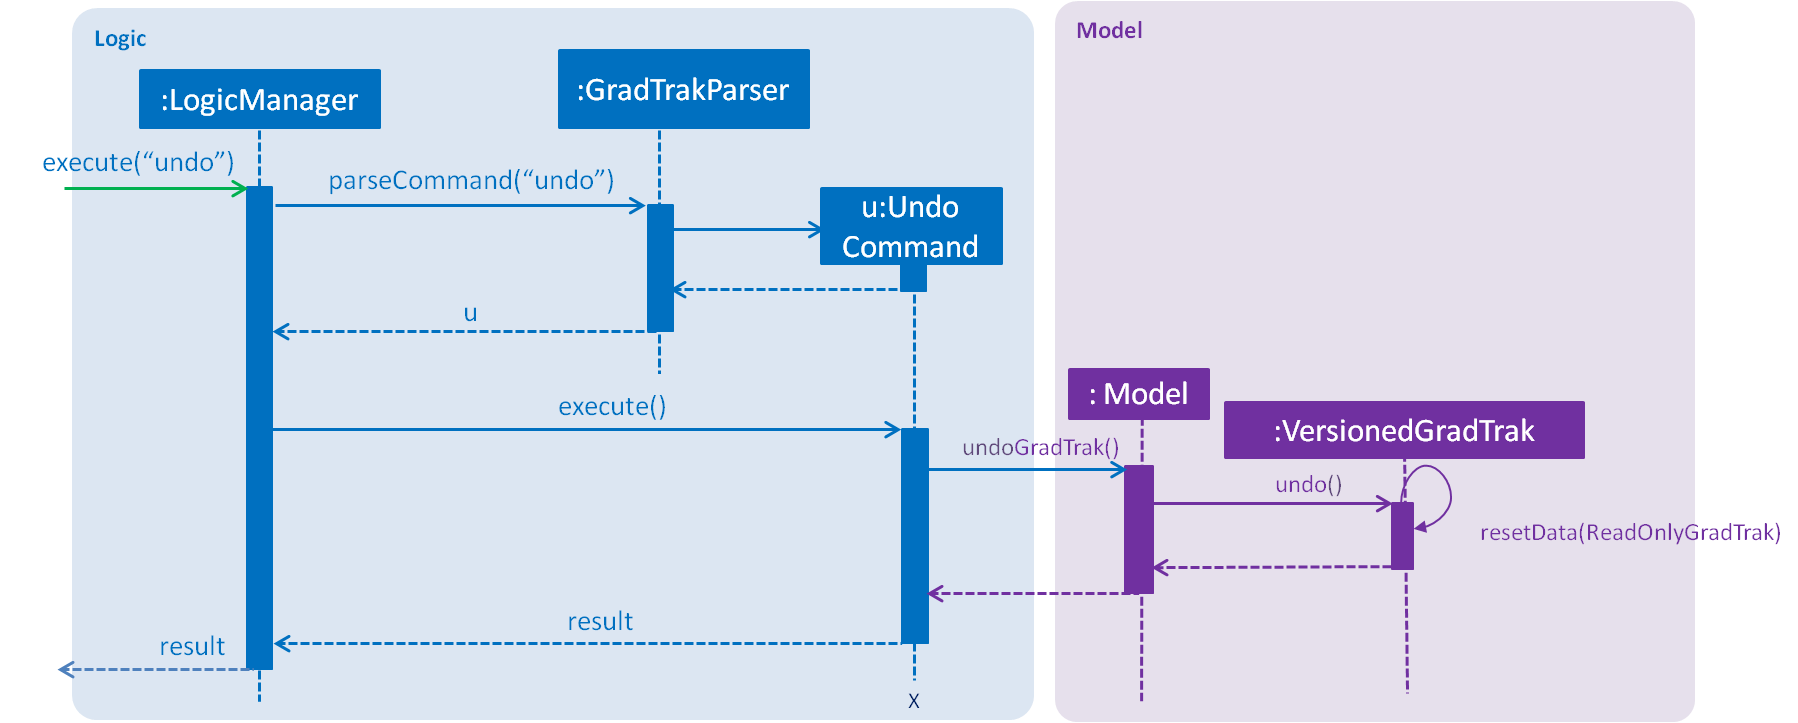
Step 4. The student now decides that adding the module was a mistake, and decides to undo that action by executing the undo command. The undo command will call Model#undoGradTrak(), which will shift the currentStatePointer once to the left, pointing it to the previous GradTrak state, and restores the GradTrak to that state.
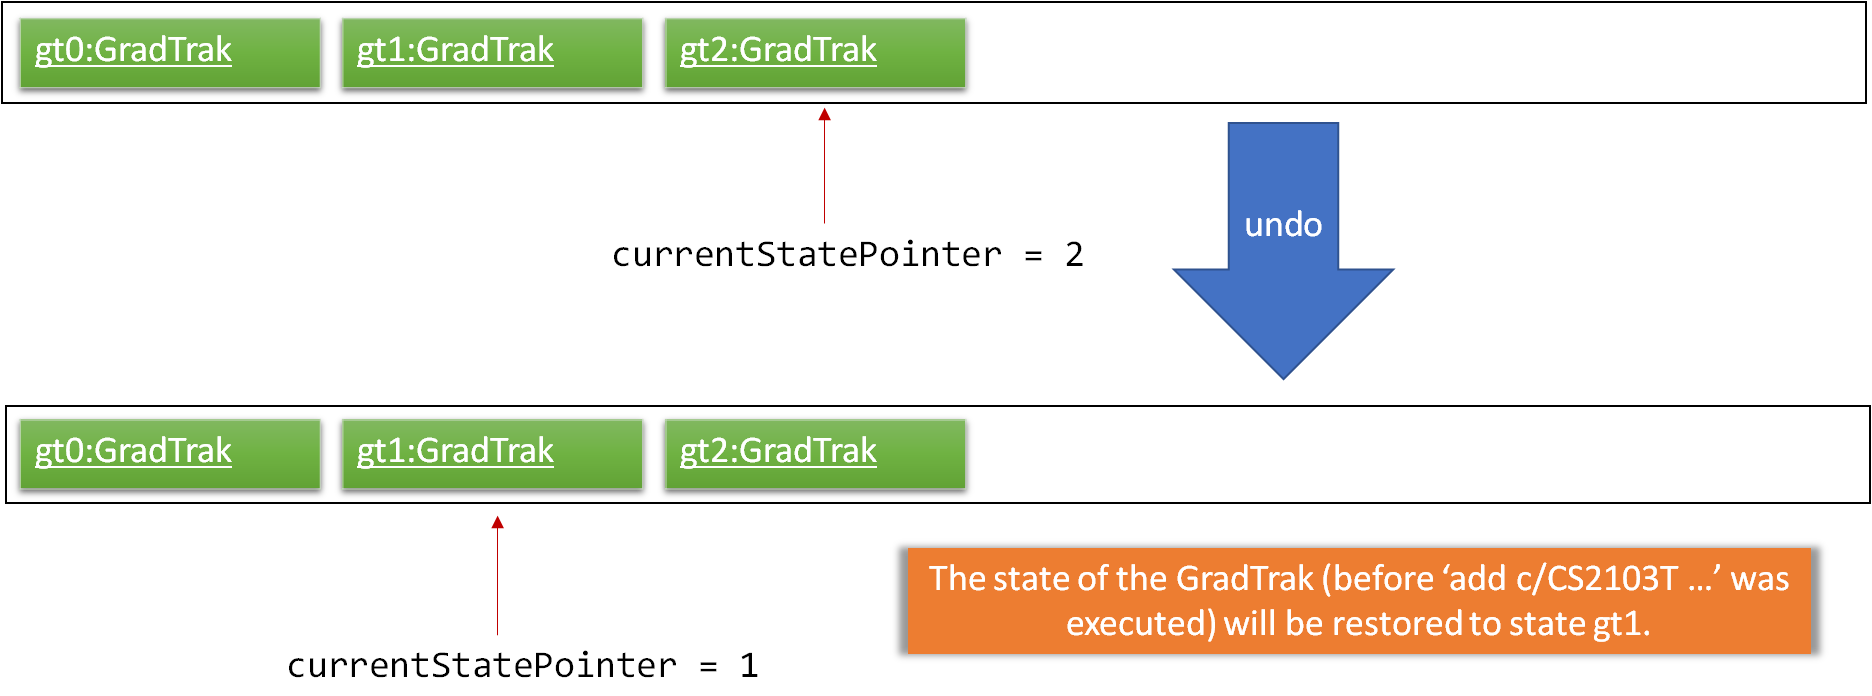
If the currentStatePointer is at index 0, pointing to the initial GradTrak state, then there are no previous GradTrak states to restore. The undo command uses Model#canUndoGradTrak() to check if this is the case. If so, it will return an error to the student rather than attempting to perform the undo.
|
The following sequence diagram shows how the undo operation works:
The redo command does the opposite — it calls Model#redoGradTrak(), which shifts the currentStatePointer once to the right, pointing to the previously undone state, and restores the GradTrak to that state.
If the currentStatePointer is at index gradTrakStateList.size() - 1, pointing to the latest GradTrak state, then there are no undone GradTrak states to restore. The redo command uses Model#canRedoGradTrak() to check if this is the case. If so, it will return an error to the student rather than attempting to perform the redo.
|
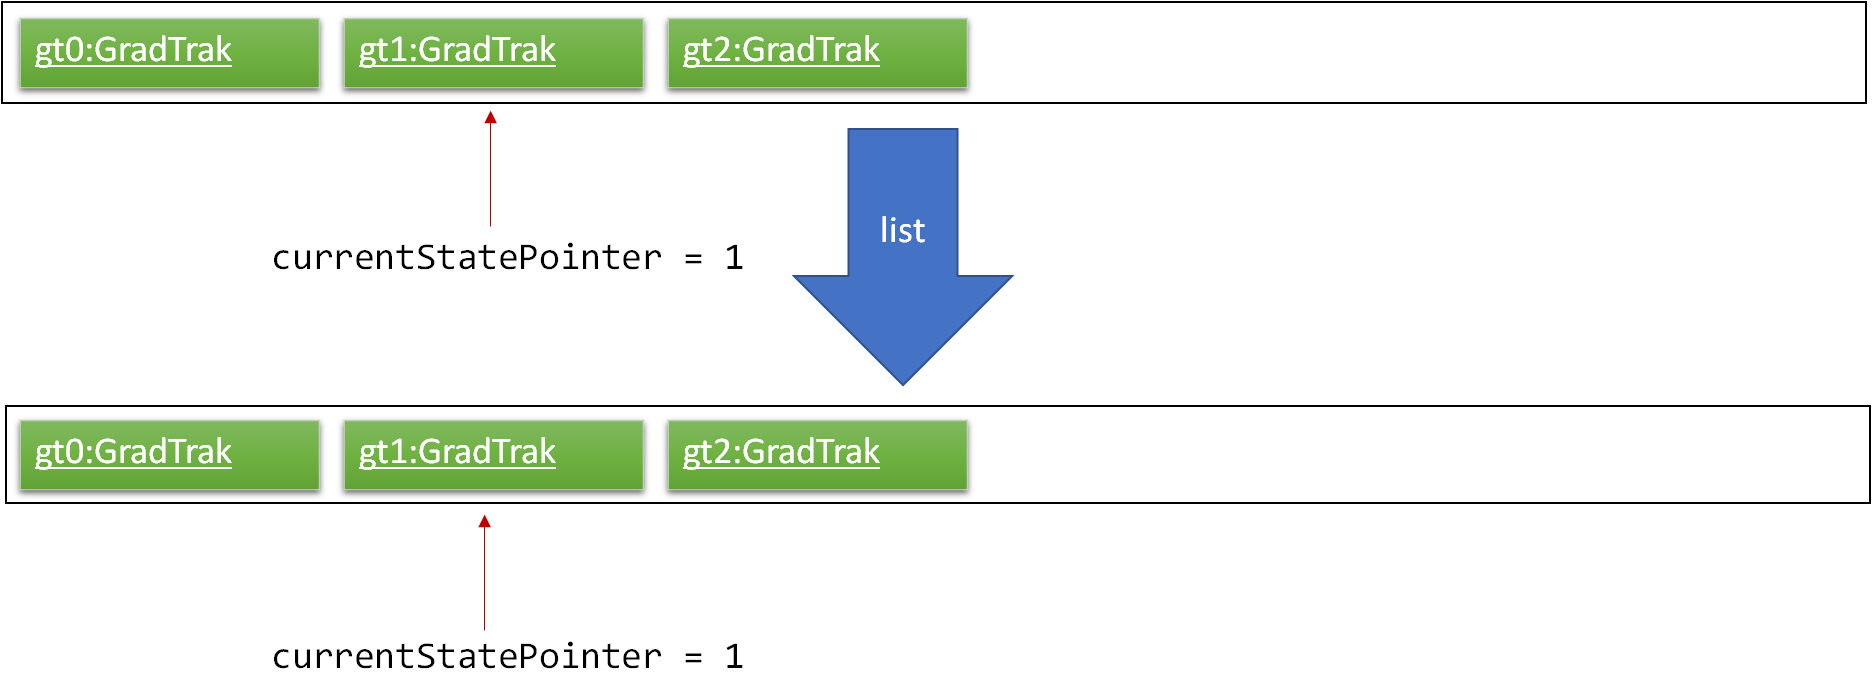
Step 5. The student then decides to execute the command list. Commands that do not modify the GradTrak, such as list, will usually not call Model#commitGradTrak(), Model#undoGradTrak() or Model#redoGradTrak(). Thus, the gradTrakStateList remains unchanged.
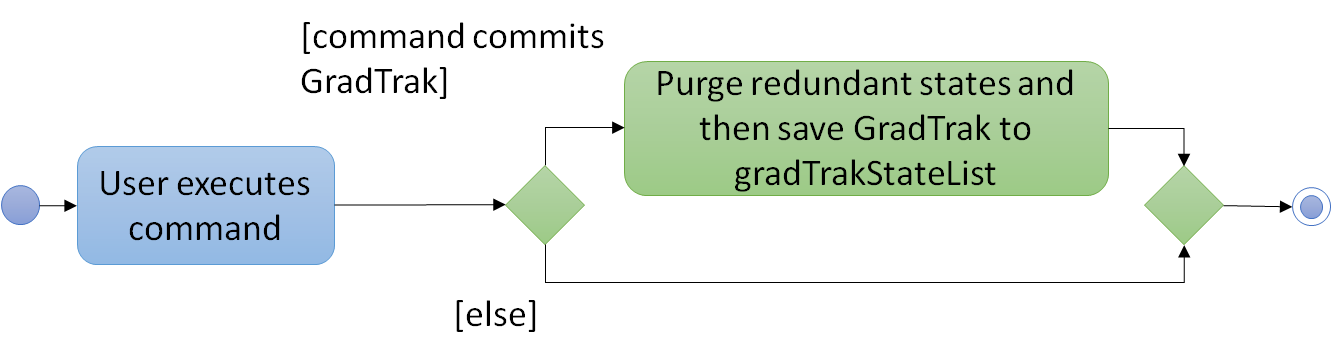
Step 6. The student executes clear, which calls Model#commitGradTrak(). Since the currentStatePointer is not pointing at the end of the gradTrakStateList, all GradTrak states after the currentStatePointer will be purged. We designed it this way because it no longer makes sense to redo the add c/CS2103T … command. This is the behavior that most modern desktop applications follow.

The following activity diagram summarizes what happens when a student executes a new command:
3.2.2. Design Considerations
Aspect: How undo & redo executes
-
Alternative 1 (current choice): Saves the entire GradTrak.
-
Pros: Easy to implement.
-
Cons: May have performance issues in terms of memory usage.
-
-
Alternative 2: Individual command knows how to undo/redo by itself.
-
Pros: Will use less memory (e.g. for
delete, just save the person being deleted). -
Cons: We must ensure that the implementation of each individual command are correct.
-
Aspect: Data structure to support the undo/redo commands
-
Alternative 1 (current choice): Use a list to store the history of GradTrak states.
-
Pros: Easy for less experienced developers to understand.
-
Cons: Logic is duplicated twice. For example, when a new command is executed, we must remember to update both
HistoryManagerandVersionedGradTrak.
-
-
Alternative 2: Use
HistoryManagerfor undo/redo-
Pros: We do not need to maintain a separate list, and just reuse what is already in the codebase.
-
Cons: Requires dealing with commands that have already been undone: We must remember to skip these commands. Violates Single Responsibility Principle and Separation of Concerns as
HistoryManagernow needs to do two different things.
-
3.3. Display Course Requirement feature
3.3.1. Current Implementation
The displayreq command allows the students to see all their course requirements and also check if the modules they have
taken fulfils them. This command is currently facilitated by 2 classes in Model, CourseRequirement and
RequirementStatus:
CourseRequirement Interface
As there are many different kinds of course requirements that can be found in NUS, it is difficult to iron down the common characteristic they all share. This can be seen in the examples found below:
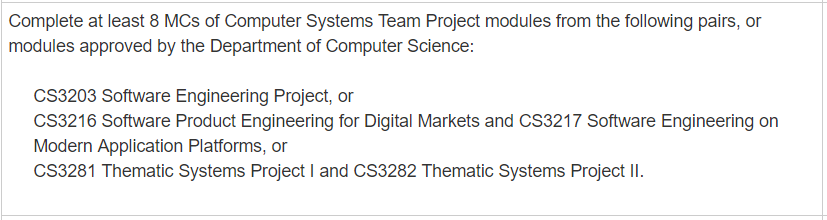
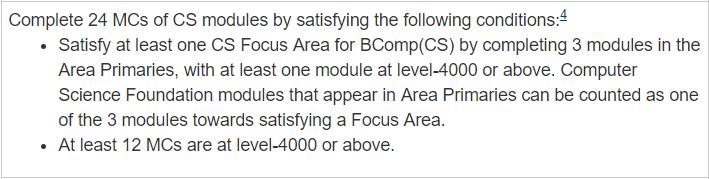
For the requirement shown in Figure 9, students just have to complete at least one of CS3203 or CS3216 and CS3217 or CS3281 and CS3282. Whereas for the requirement in Figure 10, students have to fulfill all of the conditions stated above. Even though these two conditions might seem quite different, we are still able to draw some key observations about what they have in common:
-
Each requirement is composed of conjunction or disjunction of clauses. In turn, the clauses can be composed by conjunction and disjunction of other simpler clauses.
-
Clauses that cannot be further broken down into smaller clauses usually contain the following information:
-
a list of modules that can be used to satisfy the clause
-
how many of the modules should be completed to satisfy the clause.
-
These observations gives us some insight as to how we should design the interface. As such, the CourseRequirement interface follows a Composite design pattern. This is favoured as it allows
us to treat individual and composition of CourseRequirement objects uniformly through the use of polymorphism. The diagram below gives an overview of
how CourseRequirement is implemented.

CourseRequirement class diagramThis interface is realised by 2 subclasses - PrimitiveRequirement and CompositeRequirement.
The PrimitiveRequirement is the simplest building block for CourseRequirement. Each PrimitiveRequirement stores a
list of Condition objects. A Condition object stores a Java Pattern and an int, minToSatisfy. A Condition
is satisfied if there are at least minToSatisfy many distinct
ModuleInfoCode that matches Pattern in it. PrimitiveRequirement is satisfied only if all Condition objects in the list are
fulfilled.
For instance in Figure 9, a suitable Condition for completing CS3216 and CS3217 would be
a Pattern that accepts only CS3216 or CS3217, and a minToSatisfy of 2.
The CompositeRequirement can replicate the behaviour of more complex course requirements. Each CompositeRequirement
object contains two CourseRequirement objects. It also contains a LogicalConnector enumeration
that tells the CompositeRequirement how two different CourseRequirement are composed using logical operations. For instance, for
a list of ModuleInfoCode to satisfy a CompositeRequirement that has a AND LogicalConnector, the list must
satisfy the both CourseRequirement objects contained in CompositeRequirement.
There currently 3 methods that CourseRequirement provides information to the student:
-
isFulfilled()— a method that accepts a list ofModuleInfoCodeand returns abooleanto indicate whether the list ofModuleInfoCodecan satisfy the all theCourseRequirement-
In
PrimitiveRequirement, this is achieved by checking whether all theModuleInfoCodesatisfies all theConditionstored in it. -
In
CompositeRequirement, this is dependent on theLogicalConnectorit has. It would return the value of firstCourseRequirement#isFulfilledLogicalConnectorsecondCourseRequirement#isFulfilled.
-
-
percentageFulfilled()— a method that also accepts a list of ModuleInfoCode returns adoublevalue that represents the percentage of completion of theCourseRequirement-
In
PrimitiveRequirement, this is achieved by calculating the number of distinct modules that satisfy for eachCondition, inPrimitiveRequirementand it is divided by the sum ofminToSatisfy. -
This depends on the
LogicalConnectorinCompositeRequirement. If it is aORconnector, we return the maximum offirst#percentageFulfilledorsecond#percentageFulfilled. TheANDlogical connector returns the average of the degree of completion for both requirements.
-
-
getUnfulfilled()— a method that accepts a list ofModuleInfoCodeand returns a list of RegExes from where none of theModuleInfoCodematches. This method is used in the module recommendation feature.
RequirementStatus Class
The RequirementStatus is an association class that links a CourseRequirement with VersionedGradTrak in Model.
This can be seen in the class diagram below:
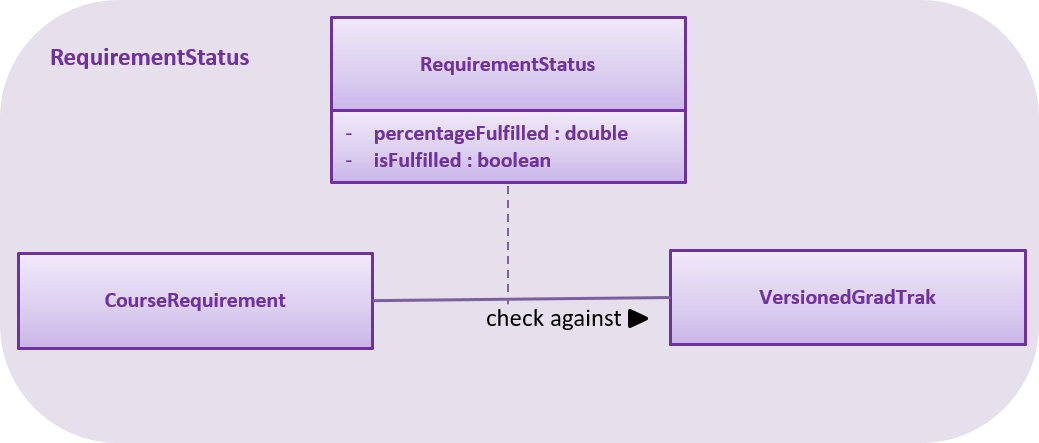
RequirementStatus class diagramIt also stores the result of the associated CourseRequirement object’s isFulfilled and percentageFulfilled
methods acting on the list of ModuleInfoCode.
Below is a sequence of execution when displayreq command is executed by the student:
-
Model#updateRequirementStatusListis called. This updates the pre-existingRequirementStatusListand fills it with newRequirementStatusobjects based on currentnonFailedCodeListfromGradTrak. -
UIcallsgetRequirementStatusListfromLogicand retrieves the updatedRequirementStatusListfromModel. This list is displayed in theResultPanel.
The sequence diagram below summarises the execution mentioned earlier:
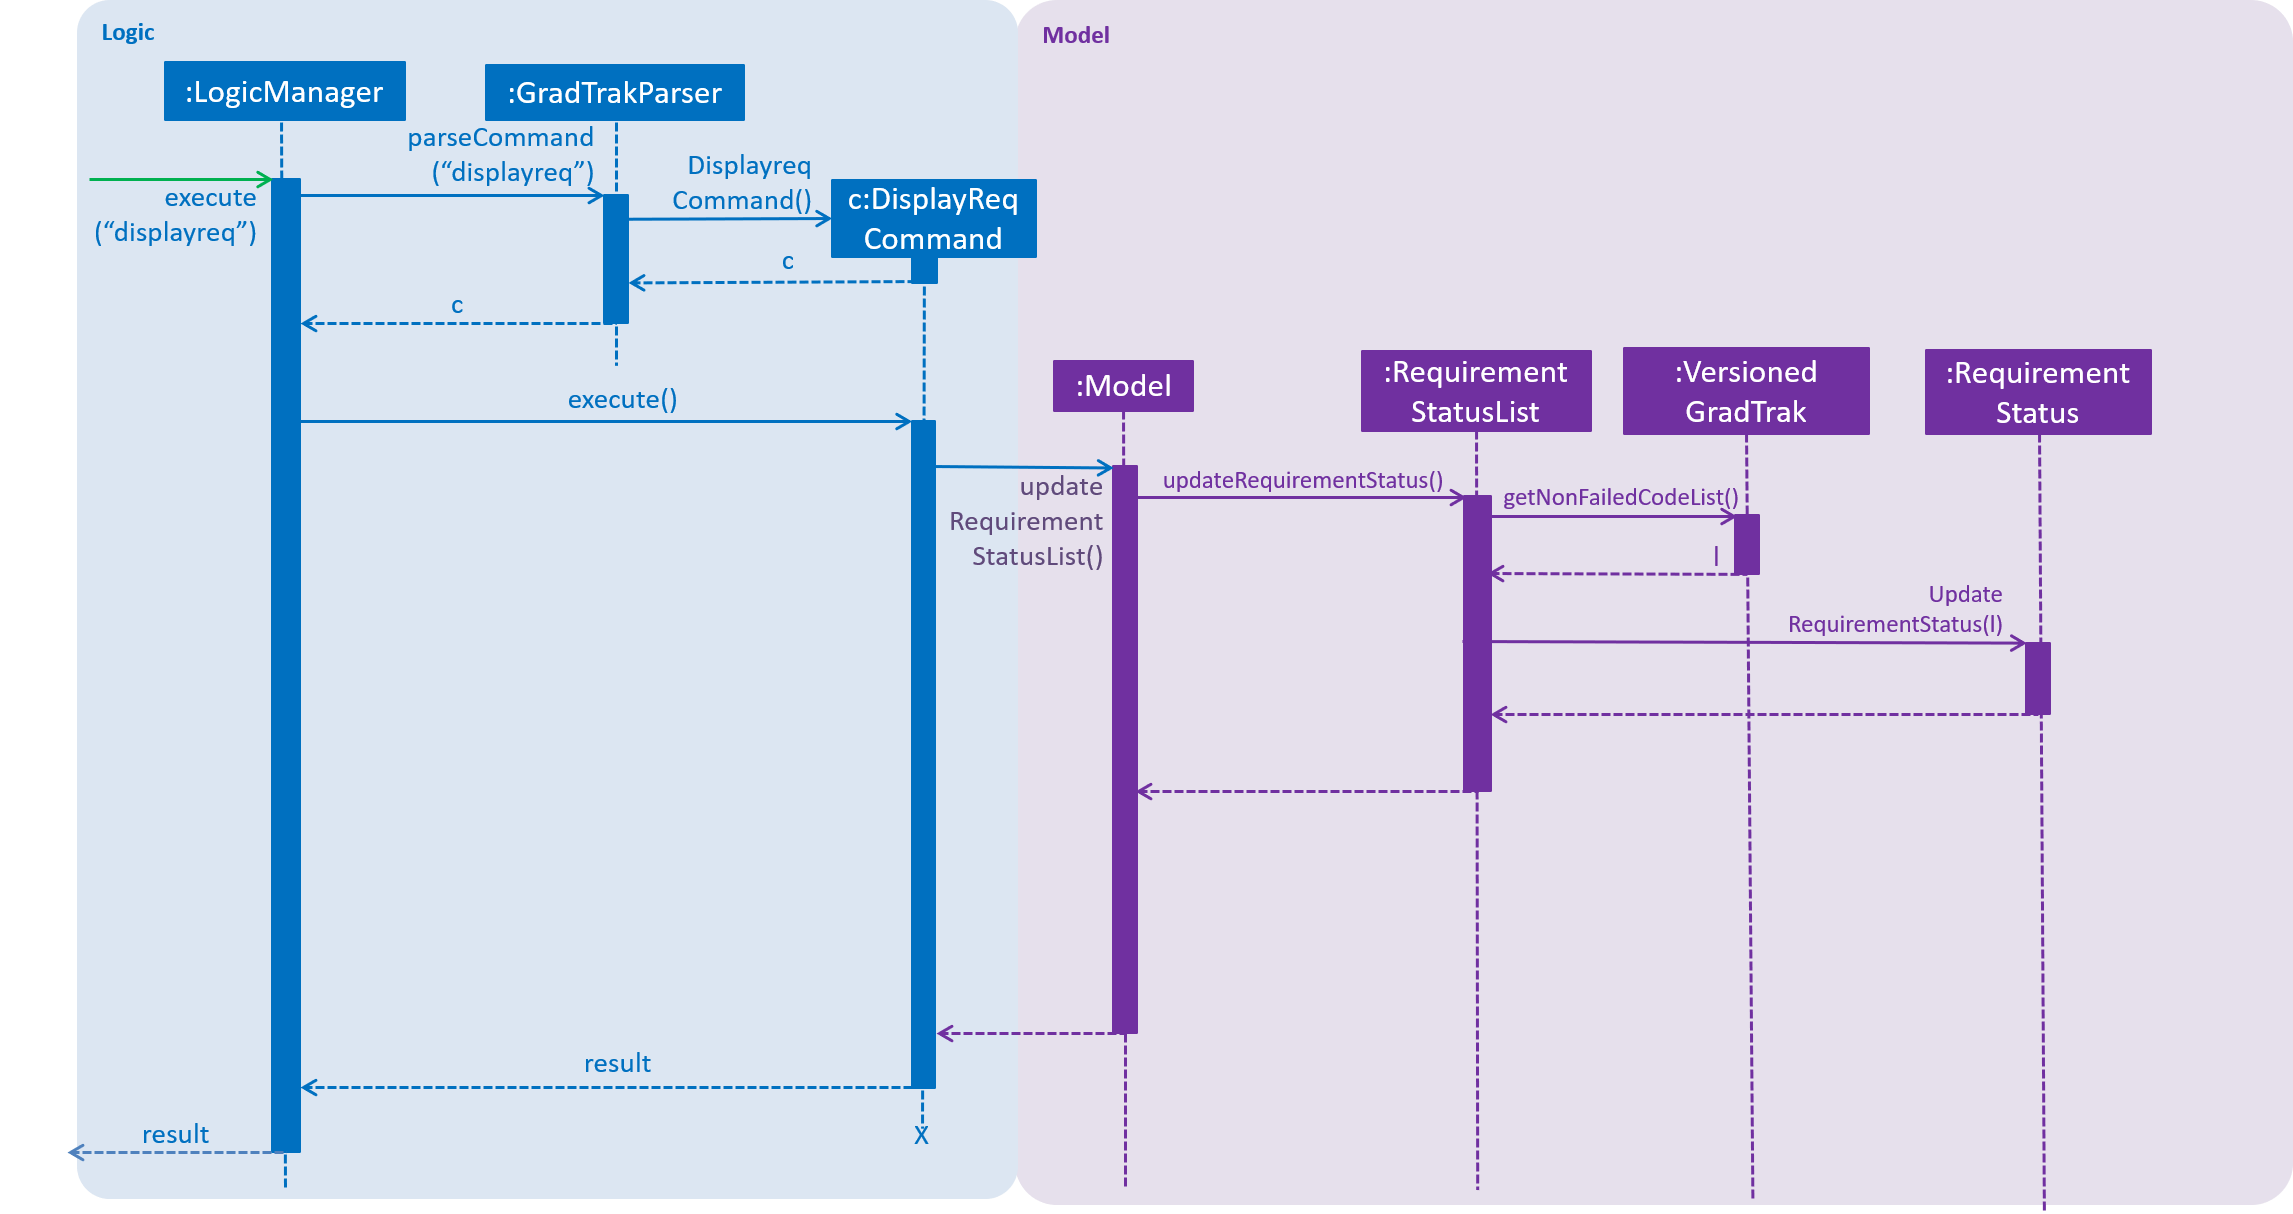
displayreq executes3.3.2. Design Considerations
Aspect: How Condition class checks if it is fulfilled.
-
Current choice: Checking
Conditionfulfilled by only usingModuleInfoCodeofModuleTaken-
Pros: Easy to implement since we are restricting scope to only checking whether strings match pattern in
Condition -
Cons: Possible that the
CourseRequirementclass is unable to replicate requirements that does not depend onModuleInfoCode
-
-
Alternative: Checking Requirement fulfilled by accessing any attribute of
ModuleTaken-
Pros: Increased flexibility and easier to replicate actual NUS requirements that does not depend on
ModuleInfoCode -
Cons: Increased complexity to implement
CourseRequirementclass properly.
-
We chose the current choice over the alternative due to time constraints in the project. Moreover, our current choice is sufficient to replicate most NUS requirements accurately.
Aspect: Choice of information stored in Condition class
-
Current choice:
Conditionclass stores aPatternto check whether a requirement is satisfied-
Pros: Compact representation of which
ModuleInfoCodefulfills the requirement -
Cons: Difficult to find the correct regular expression for some
Condition.
-
-
Alternative:
Conditionclass stores an exact list ofStringto check whether a condition is satisfied-
Pros: Easy and interpretive to use.
-
Cons: Might need to store a long list of
Stringif many modules can fulfil theConditioneg: General Education Modules
-
We chose our current choice as it takes up much fewer space to store. Moreover, storing a pattern
also improves performance time since each ModuleInfoCode is compared against one`Pattern` instead of an entire
list of String objects.
3.3.3. Possible Improvements
-
Allow students to create and export their own
CourseandCourseRequirementobjects. -
Allow
Conditionto check its fulfillment by accessing other attributes of aModuleTakenobject in the future.
3.4. Module recommendation feature
The module recommendation feature displays modules which the student is recommended to read based on the current module plan
and specific course requirements. It generates a list of module codes together with their corresponding titles and requirement
types satisfied. The entire list is displayed on the Result Panel upon entering the rec command.
| Modules which satisfy only Unrestricted Electives are not included to prevent the list from being too long. |
3.4.1. Current implementation
Each recommended module is represented by a RecModule which contains a unique ModuleInfo and its corresponding
CourseReqType satisfied, as shown in the diagram below.
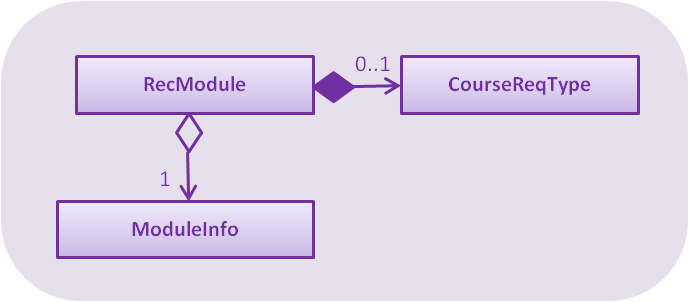
RecModule class diagramWhen ModelManager is initialised, Model#getObservableRecModuleList is called which generates an
ObservableList of RecModule , one for each module in the entire ModuleInfoList. This list is wrapped in a FilteredList,
which is further wrapped in a SortedList, both stored in ModelManager. At this point, all RecModule in the list contain an empty CourseReqType field.
When the rec command is entered, the sequence of execution is as follows:
-
Model#updateRecModuleListis called, which creates aRecModulePredicategiven the student’sCourseandReadOnlyGradTrak, and aRecModuleComparator. -
The
RecModulePredicateis applied to theFilteredListofRecModule. In each test:-
An
EligibleModulePredicatewhich takes inReadOnlyGradTraktests if theModuleInfoof thisRecModuleis eligible to be read. If the module is already present in the module plan or does not have its prerequisites satisfied, thisRecModuleis filtered out. -
The
ModuleInfoCode(call itcodeToTest) of theRecModuleis retrieved.
AnonFailedCodeListofModuleInfoCodecorresponding to non-failedModuleTaken(already passed or to be read in a future semester) is also retrieved fromReadOnlyGradTrak. -
The
codeToTestis then passed intoCourse#getCourseReqTypeOf, which in turn callsCourseRequirement#canFulfillfor eachCourseRequirementlisted inCourse. A list ofCourseReqTypethat thecodeToTestcan satisfy is returned. ThiscourseReqTypeListis sorted by the priority ofCourseReqTypeas defined in theenumclass:CORE,BD,IE,FAC,GE. -
For each
CourseReqTypein thecourseReqTypeList(highest priority first):-
Course#isCodeContributingis called, which takes in theCourseReqType,nonFailedCodeListandcodeToTest. -
For each
CourseRequirementlisted inCoursecorresponding to the givenCourseReqType,CourseRequirement#getUnfulfilledis called which takes in thenonFailedCodeListand returns anunfulfilledRegexListof RegExes not satisfied. -
If the
codeToTestmatches any of the RegExes in theunfulfilledRegexList,Course#isCodeContributingreturnstrueand the loop forcourseReqTypeListterminates.
-
-
The
CourseReqTypeof highest priority satisfied bycodeToTestis then set into theRecModule. However, if thecodeToTestdoes not contribute to any of theCourseRequirementlisted inCourse, thisRecModuleis filtered out.
-
-
The
RecModuleComparatoris applied to theSortedListofRecModule. It sorts the list in decreasing priority of theCourseReqTypesatisfied by theRecModule. ThoseRecModulewith equal priority are sorted by module level (the first numerical digit of itsModuleInfoCode), considering that lower level modules are usually read first. In the case of equal priority and module level, lexicographical sorting of itsModuleInfoCodeis used. -
The
SortedListofRecModuleis retrieved fromModelManagerand displayed to the student in the Result Panel.
If there are changes to ReadOnlyGradTrak (adding, editing or deleting modules) or Course (changing the course of study), the rec command
must be run again to reflect the updated recommendation list.
The sequence diagrams summarising the above execution are shown below.
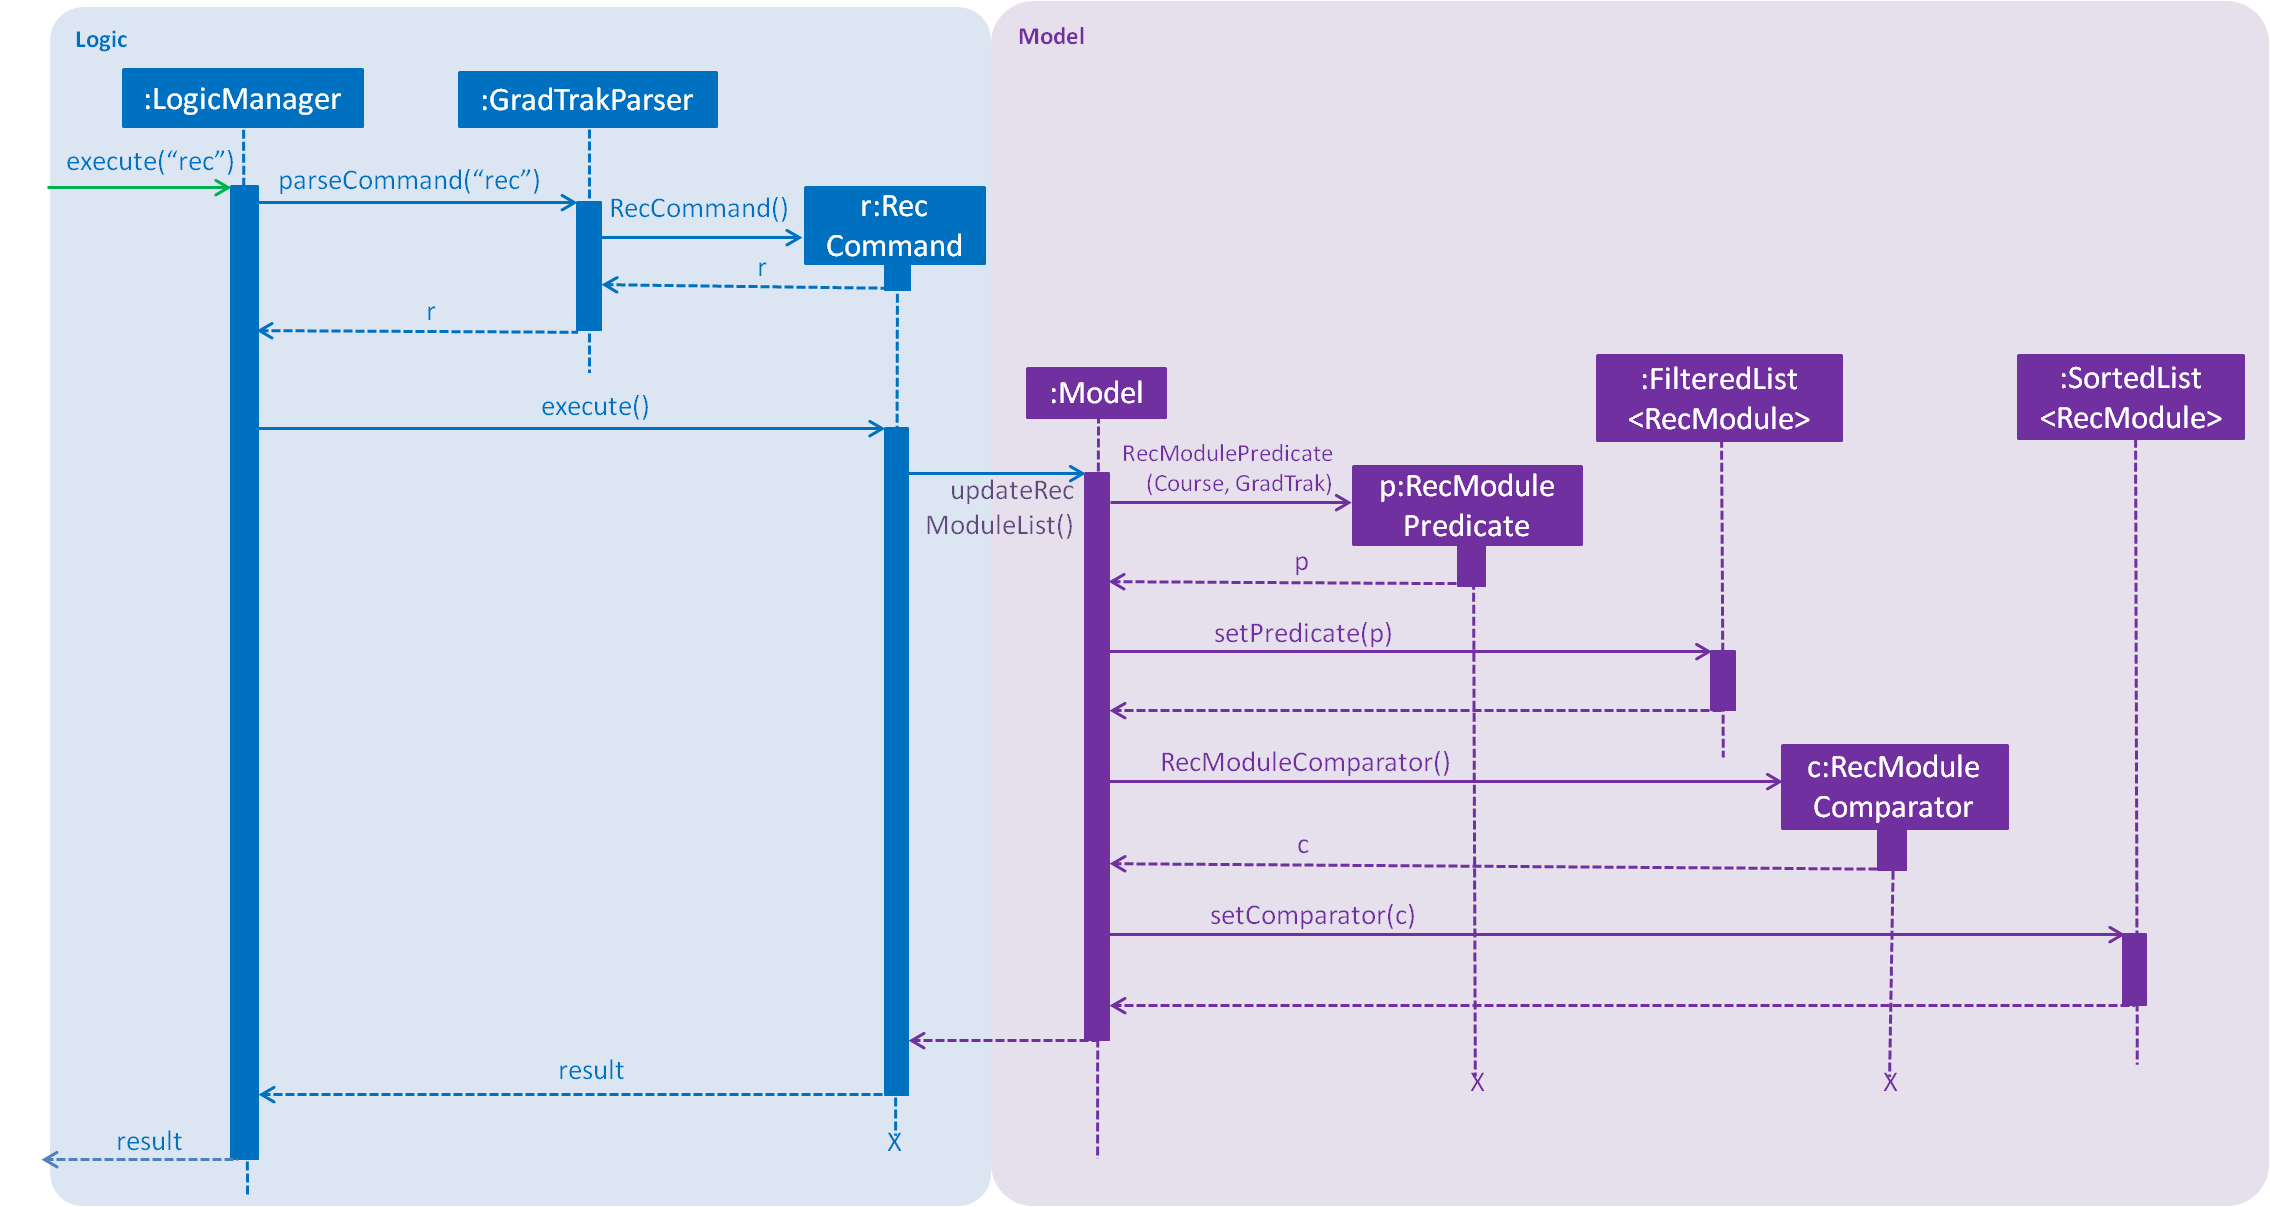
RecCommand sequence diagram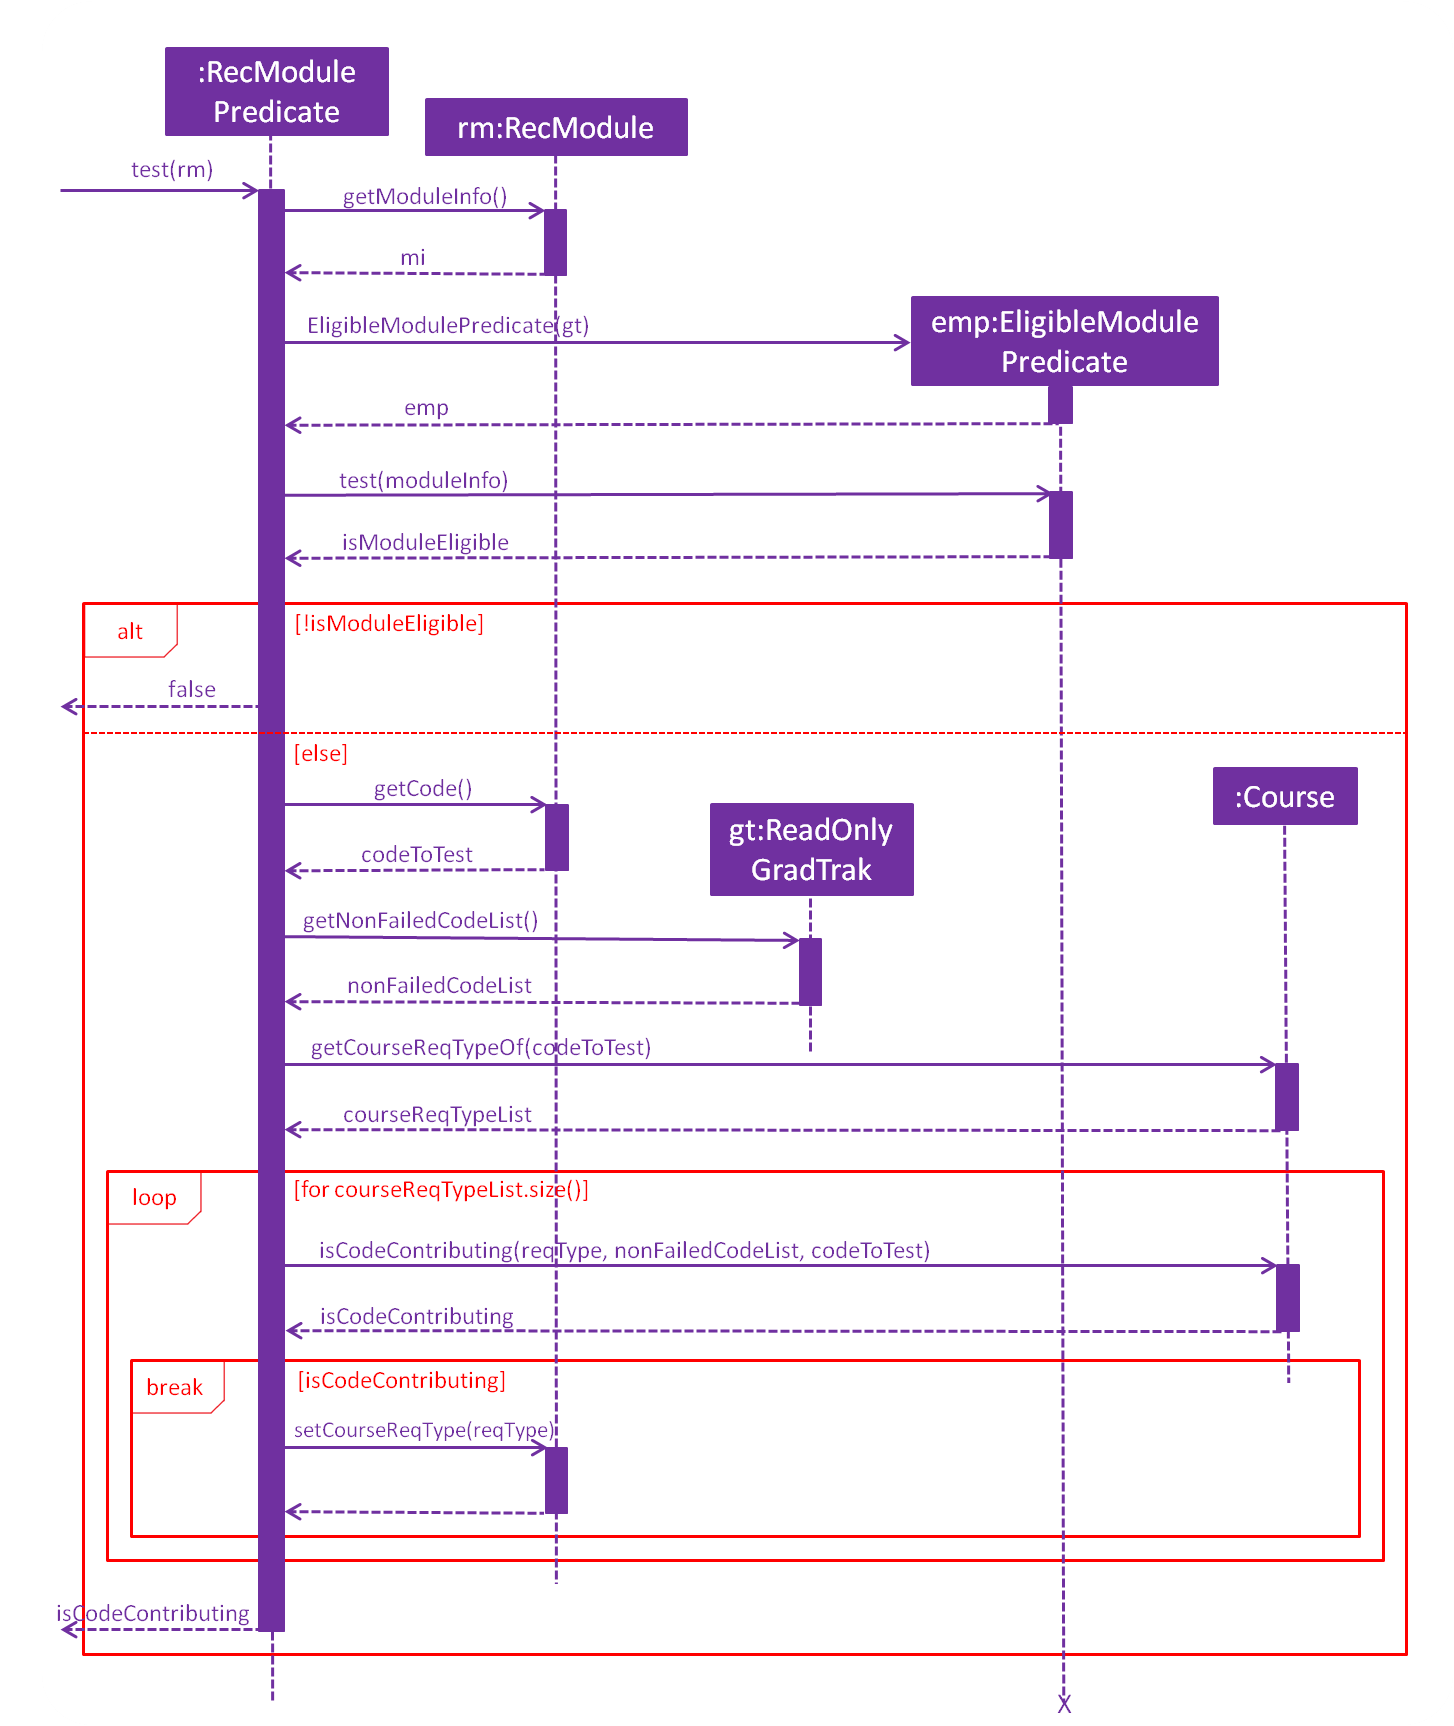
RecModulePredicate sequence diagram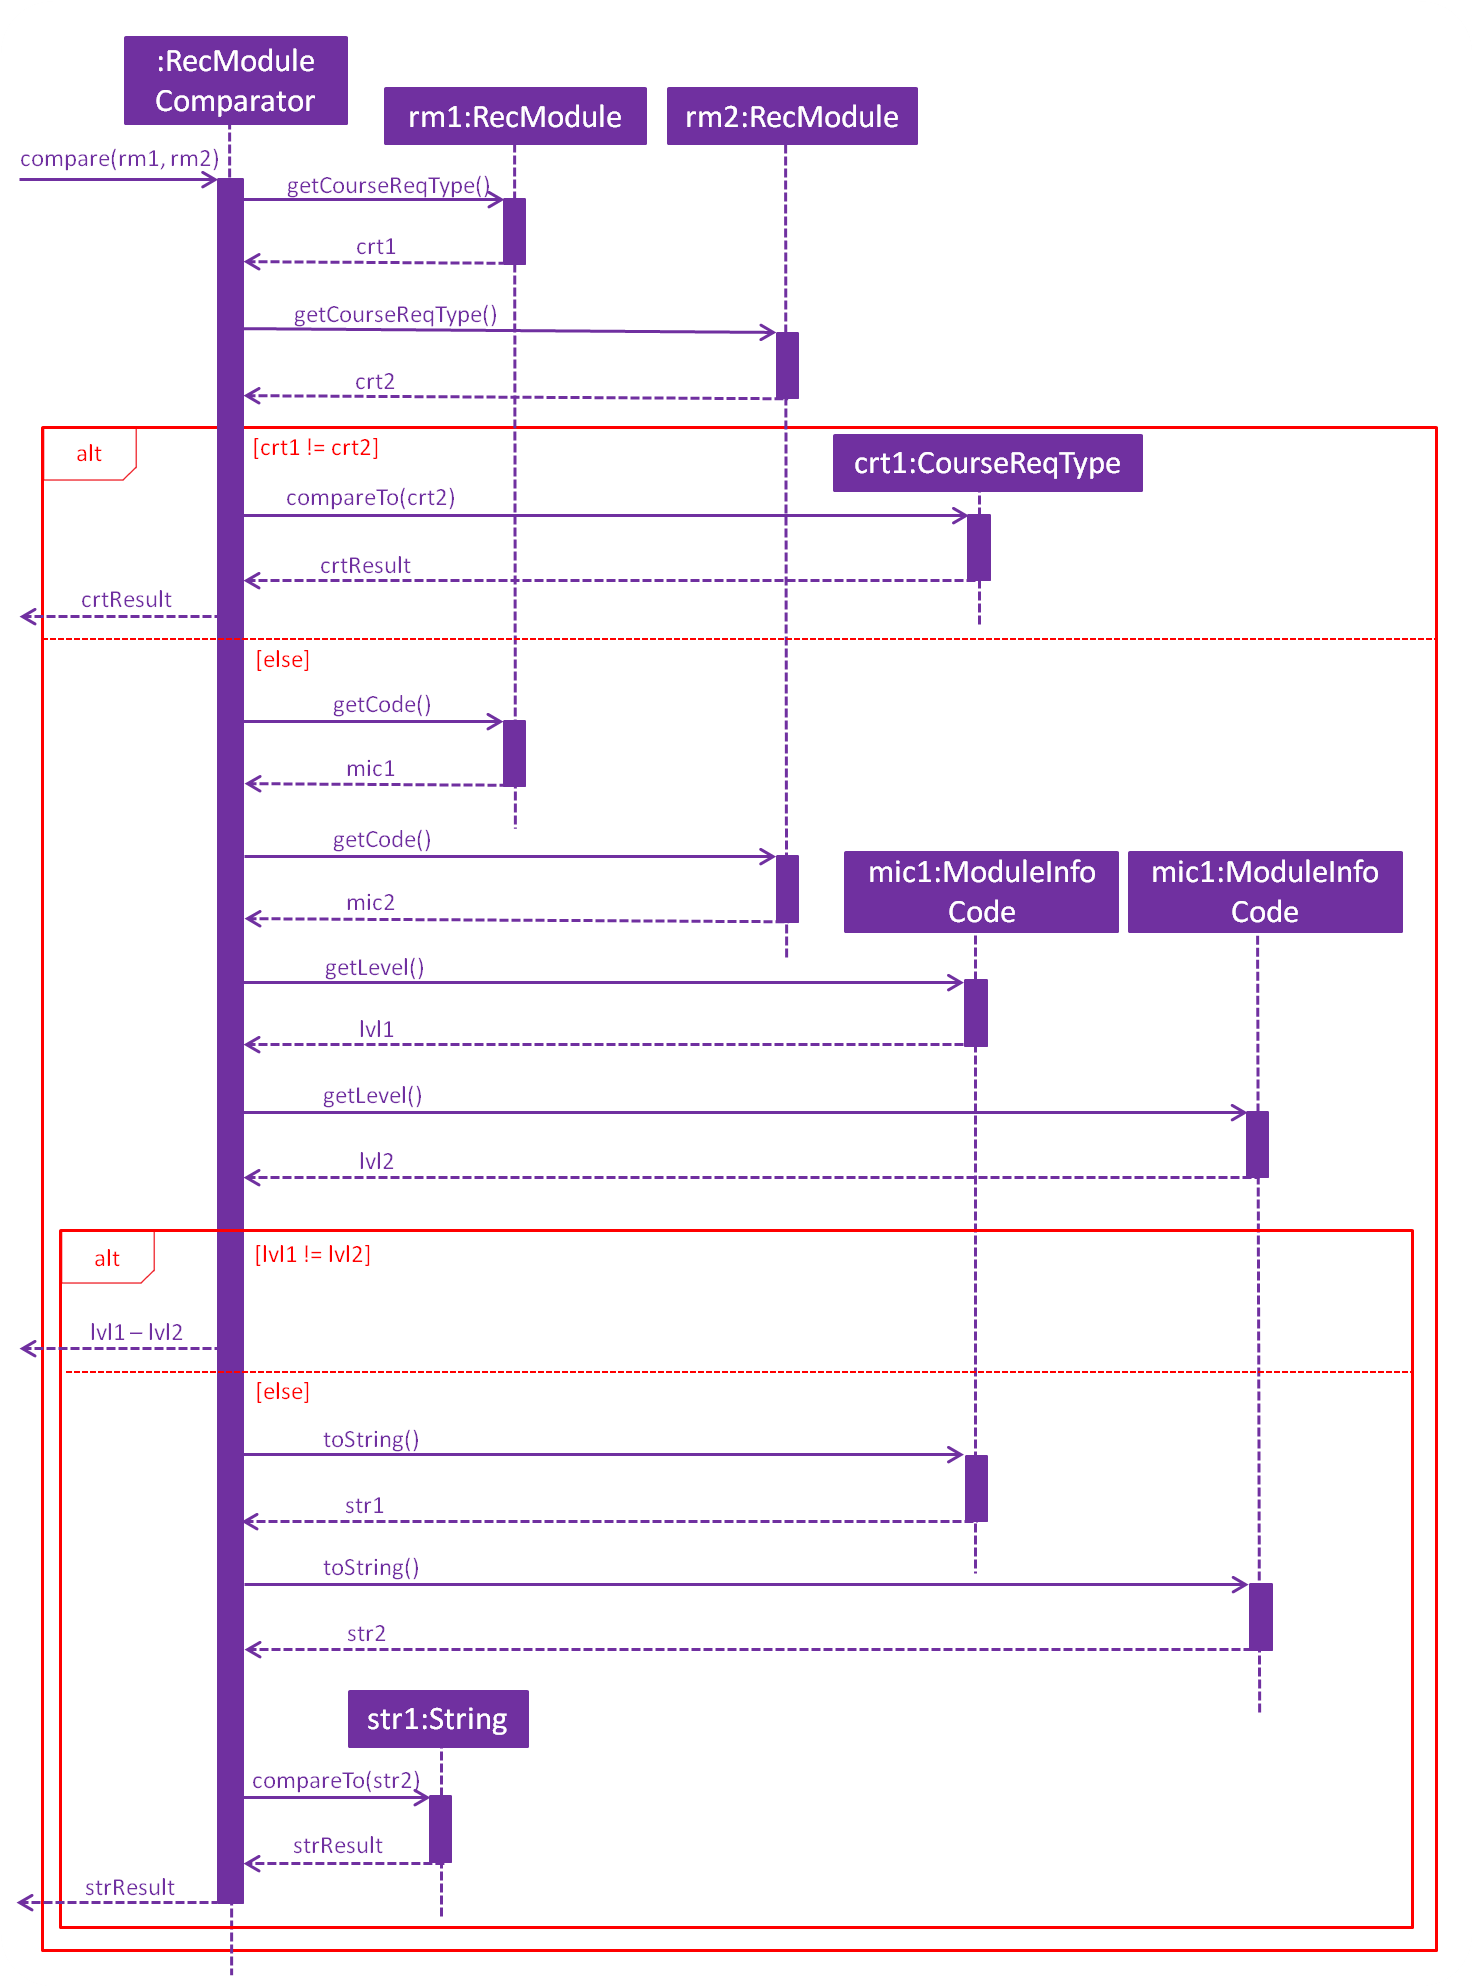
RecModuleComparator sequence diagram3.4.2. Design Considerations
Aspect: Sorting of recommendation list
-
Alternative 1 (current choice): Recommendation list is sorted by a fixed order of
CourseReqTypepriority as defined in theenumclass-
Pros: Easy to implement and modify
-
Cons: Student may have his own order of priority that differs from the default one
-
-
Alternative 2: Recommendation list can be sorted by a custom order defined by the student
-
Pros: Student can sort the list according to his own preferences
-
Cons: Difficult to implement if several parameters for sorting is allowed; input method for the custom order is problematic
-
Aspect: Format of recommendation
-
Alternative 1 (current choice): Display a list of all eligible modules that contribute to course requirements
-
Pros: Student has a greater freedom of choice
-
Cons: Student may be confused or unable to decide if the list is too long
-
-
Alternative 2: Display
nmodules for each semester, wherenis decided by the student-
Pros: Student can plan modules for specific semesters easily and quickly
-
Cons: Algorithm required to plan for all semesters can be complex; student may not prefer the given plan
-
3.4.3. Possible Improvements
-
Allow the student to display a module’s information (from
displaymodcommand) using its index in the recommendation list -
Allow the student to add a module to the module plan using its index in the recommendation list
-
Enable recommendation of Unrestricted Electives based on personal interests of the user
3.5. Checking of limits
3.5.1. Current Implementation
The cklimit command is able to calculate the CAP and workload information of the current module plan and display the results in a report together with the preferred limits set by the student for comparison.
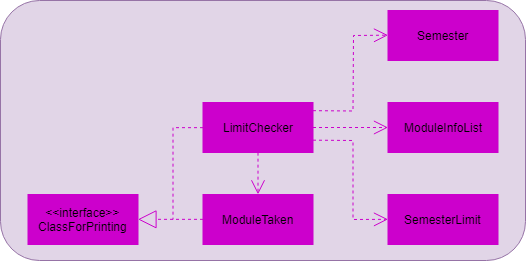
The LimitChecker class does all the computation and generation of the report.
It makes use of the following classes as input:
-
Semesterthat holds the current semester -
ObservableListofSemesterLimitsthat holds the current semester limits -
ObservableListofModuleTakensthat holds the list of modules currently planned -
ModuleInfoListthat holds the list of modules with the number of module credits they have
The LimitChecker class is modelled with the class diagram as shown below.
LimitChecker class diagramGradTrak uses the following classes to store and manipulate the variables for calculation:
-
CapAverage -
WeightedGrade -
ModuleInfoCredits
The CapAverage class contains an ArrayList of WeightedGrades.
Each WeightedGrade has a CAP score and information on the number of module credits weighted by the score.
The aggregated minimum and maximum expected CAP is calculated with the minimum and maximum expected CAP of every module taken respectively.
The current CAP only includes modules that are completed. Modules are considered completed if they are taken on a semester before the current semester.
The CAP of the student is calculated using the formula below.

The total number of hours for each type of workload for each semester are also summed up to be displayed.
Once all the calculations are completed, the HTML string report is generated and stored in the checkedReport variable in the LimitChecker to be displayed.
LimitChecker implements the ClassForPrinting and can be used to set the HTML string generated to be displayed on the BrowserPanel using the setSelectedClassForPrinting method as seen below.
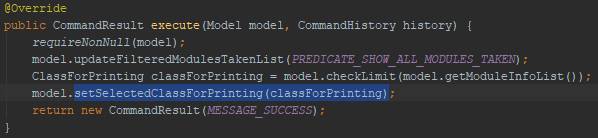
ClassForPrinting3.5.2. Design Considerations
Aspect: Having to change multiple types of limits.
-
Current choice: Using a single command to check both the CAP limits as well as the workload limits and print the results all to one page
-
Pros: Only one command needs to be known and it can check everything in one page to ensure that the module plan meets the selected limit preferences
-
Cons: Unwanted information that was not requested will also be shown on the page and may cause confusion
-
-
Alternative: Using separate commands to display CAP limits and workload limits on their own individual page
-
Pros: The information needed can be easily identified from the pages displayed
-
Cons: Two commands need to be known and keyed in to check the limits every time a modification is made to the module plan
-
The current choice was chosen because the student will become more experienced and familiar with GradTrak over time and be less confused by the result page. Scrolling up and down the page is easier than having to type two commands alternatively to view the limits.
3.5.3. Possible Improvements
-
Check if any row has their minimum or maximum limits violated and highlight them to student
-
Style the table to suit the theme of the app so that the student has a better experience using the app
3.6. Current Semester Tracking
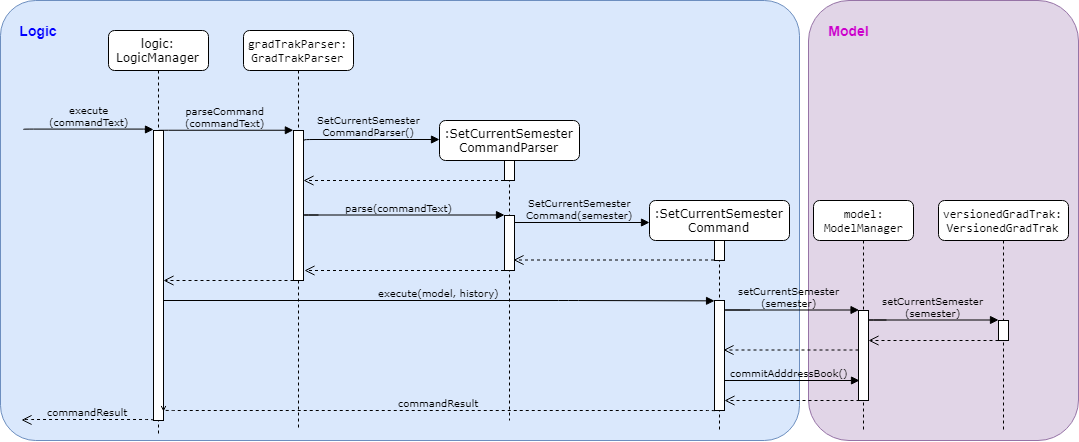
3.6.1. Current Implementation
The cursem command allows the student to track the current semester using GradTrak. This indicates completion of all modules in the previous semesters and includes them in the current CAP computation during the cklimit command.
The interaction of how the cursem command interacts with the system is shown below as a sequence diagram.
3.6.2. Design Considerations
Aspect: Storage location of the current semester.
-
Current choice: Storing of current semester within the
VersionedGradTrak-
Pros: Allows the
cursemcommand to be undoable and redoable -
Cons: The storage file
gradtrak.jsonhas to contain more than just the modules taken and it is difficult to make changes as it would require restructuring a large part of the application and multiple unit tests.
-
-
Alternative: Storing of the current semester outside of the
VersionedGradTraktogether with the module and course information-
Pros: Minimal changes are required to implement it
-
Cons: Problems may occur later on in maintaining the integrity of the application as
cursemcan only be performed if grades in the previous semesters have been finalized. Theundoandredocommands can bypass the checks for finalized grades and lead to instability in the application.
-
The current choice was chosen because it will be worth the effort to restructure the application storage to make GradTrak easier to develop in the future and be less likely to cause problems.
3.6.3. Possible Improvements
-
Prevent the student from adding or editing his module plan if doing so will violate the limits set
-
Allowing the student to type semester indexes instead of the entire semester name
3.7. Semester CAP and workload management feature
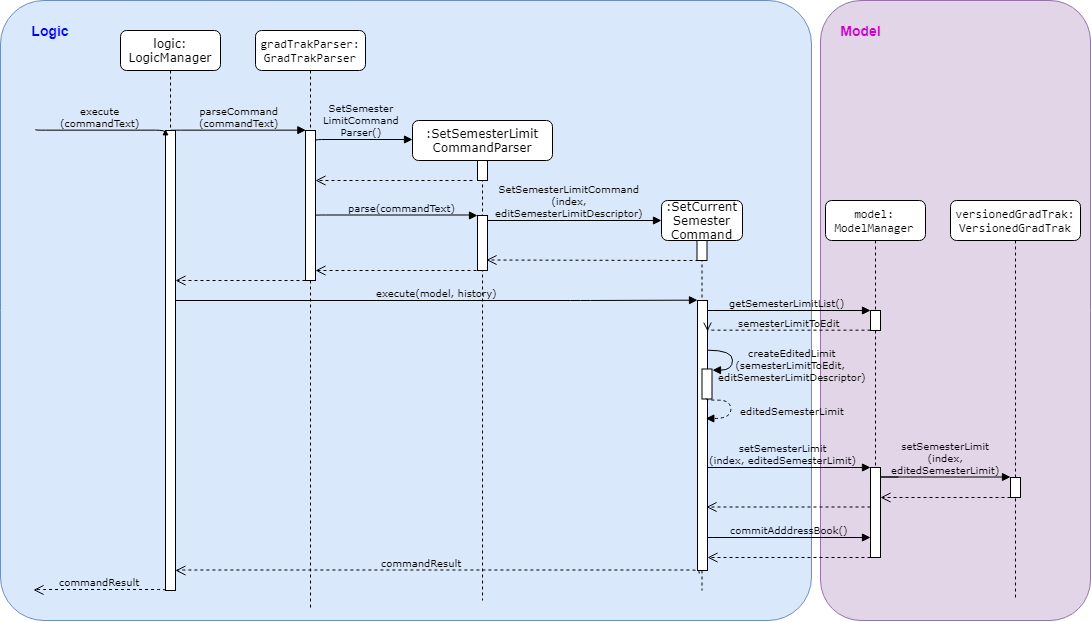
3.7.1. Current Implementation
The setlimit command allows the student to set CAP limits and workload limits for each semester. This helps the student manage the difficulty and time required of the modules taken. Various types of limits can be set, such as the minimum and maximum number of weekly lecture hours, tutorial hours, lab hours, project hours, and preparation hours acceptable, as well as the minimum and maximum CAP acceptable for each semester.
The interaction of the setlimit command with the system is shown below as a sequence diagram.
3.8. Logging
We are using java.util.logging package for logging. The LogsCenter class is used to manage the logging levels and logging destinations.
-
The logging level can be controlled using the
logLevelsetting in the configuration file (See Section 3.9, “Configuration”) -
The
Loggerfor a class can be obtained usingLogsCenter.getLogger(Class)which will log messages according to the specified logging level -
Currently log messages are output through:
Consoleand to a.logfile.
Logging Levels
-
SEVERE: Critical problem detected which may possibly cause the termination of the application -
WARNING: Can continue, but with caution -
INFO: Information showing the noteworthy actions by the App -
FINE: Details that is not usually noteworthy but may be useful in debugging e.g. print the actual list instead of just its size
3.9. Configuration
Certain properties of the application can be controlled (e.g student prefs file location, logging level) through the configuration file (default: config.json).
4. Documentation
We use asciidoc for writing documentation.
| We chose asciidoc over Markdown because asciidoc, although a bit more complex than Markdown, provides more flexibility in formatting. |
4.1. Editing Documentation
See UsingGradle.adoc to learn how to render .adoc files locally to preview the end result of your edits.
Alternatively, you can download the AsciiDoc plugin for IntelliJ, which allows you to preview the changes you have made to your .adoc files in real-time.
4.2. Publishing Documentation
See UsingTravis.adoc to learn how to deploy GitHub Pages using Travis.
4.3. Converting Documentation to PDF format
We use Google Chrome for converting documentation to PDF format, as Chrome’s PDF engine preserves hyperlinks used in webpages.
Here are the steps to convert the project documentation files to PDF format.
-
Follow the instructions in UsingGradle.adoc to convert the AsciiDoc files in the
docs/directory to HTML format. -
Go to your generated HTML files in the
build/docsfolder, right click on them and selectOpen with→Google Chrome. -
Within Chrome, click on the
Printoption in Chrome’s menu. -
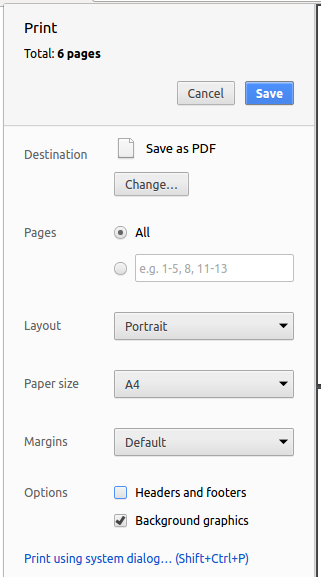
Set the destination to
Save as PDF, then clickSaveto save a copy of the file in PDF format. For best results, use the settings indicated in the screenshot below.
4.4. Site-wide Documentation Settings
The build.gradle file specifies some project-specific asciidoc attributes which affect how all documentation files within this project are rendered.
Attributes left unset in the build.gradle file will use their default values, if any.
|
| Attribute name | Description | Default value |
|---|---|---|
|
The name of the website. If set, the name will be displayed near the top of the page. |
not set |
|
URL to the site’s repository on GitHub. Setting this will add a "View on GitHub" link in the navigation bar. |
not set |
|
Define this attribute if the project is an official SE-EDU project. This will render the SE-EDU navigation bar at the top of the page, and add some SE-EDU-specific navigation items. |
not set |
4.5. Per-file Documentation Settings
Each .adoc file may also specify some file-specific asciidoc attributes which affect how the file is rendered.
Asciidoctor’s built-in attributes may be specified and used as well.
Attributes left unset in .adoc files will use their default values, if any.
|
| Attribute name | Description | Default value |
|---|---|---|
|
Site section that the document belongs to.
This will cause the associated item in the navigation bar to be highlighted.
One of: * Official SE-EDU projects only |
not set |
|
Set this attribute to remove the site navigation bar. |
not set |
4.6. Site Template
The files in docs/stylesheets are the CSS stylesheets of the site.
You can modify them to change some properties of the site’s design.
The files in docs/templates controls the rendering of .adoc files into HTML5.
These template files are written in a mixture of Ruby and Slim.
|
Modifying the template files in |
5. Testing
5.1. Running Tests
There are three ways to run tests.
| The most reliable way to run tests is the third one. The first two methods might fail some GUI tests due to platform/resolution-specific idiosyncrasies. |
Method 1: Using IntelliJ JUnit test runner
-
To run all tests, right-click on the
src/test/javafolder and chooseRun 'All Tests' -
To run a subset of tests, you can right-click on a test package, test class, or a test and choose
Run 'ABC'
Method 2: Using Gradle
-
Open a console and run the command
gradlew clean allTests(Mac/Linux:./gradlew clean allTests)
| See UsingGradle.adoc for more information on how to run tests using Gradle. |
Method 3: Using Gradle (headless)
Thanks to the TestFX library we use, our GUI tests can be run in the headless mode. In the headless mode, GUI tests do not show up on the screen. That means the developer can do other things on the computer while the tests are running.
To run tests in headless mode, open a console and run the command gradlew clean headless allTests (Mac/Linux: ./gradlew clean headless allTests)
5.2. Types of tests
We have two types of tests:
-
GUI Tests - These are tests involving the GUI. They include:
-
System tests that test the entire App by simulating user actions on the GUI. These are in the
systemtestspackage. -
Unit tests that test the individual components. These are in
seedu.address.uipackage.
-
-
Non-GUI Tests - These are tests not involving the GUI. They include:
-
Unit tests targeting the lowest level methods/classes.
e.g.seedu.address.commons.StringUtilTest -
Integration tests that are checking the integration of multiple code units (those code units are assumed to be working).
e.g.seedu.address.storage.StorageManagerTest -
Hybrids of unit and integration tests. These tests are checking multiple code units as well as how they are connected together.
e.g.seedu.address.logic.LogicManagerTest
-
5.3. Troubleshooting Testing
Problem: HelpWindowTest fails with a NullPointerException.
-
Reason: One of its dependencies,
HelpWindow.htmlinsrc/main/resources/docsis missing. -
Solution: Execute Gradle task
processResources.
6. Dev Ops
6.1. Build Automation
See UsingGradle.adoc to learn how to use Gradle for build automation.
6.2. Continuous Integration
We use Travis CI and AppVeyor to perform Continuous Integration on our projects. See UsingTravis.adoc and UsingAppVeyor.adoc for more details.
6.3. Coverage Reporting
We use Coveralls to track the code coverage of our projects. See UsingCoveralls.adoc for more details.
6.4. Documentation Previews
When a pull request has changes to asciidoc files, you can use Netlify to see a preview of how the HTML version of those asciidoc files will look like when the pull request is merged. See UsingNetlify.adoc for more details.
6.5. Making a Release
Here are the steps to create a new release.
-
Update the version
courseReqCreditsinMainApp.java. -
Generate a JAR file using Gradle.
-
Tag the repo with the version courseReqCredits. e.g.
v0.1 -
Create a new release using GitHub and upload the JAR file you created.
6.6. Managing Dependencies
A project often depends on third-party libraries. For example, GradTrak depends on the Jackson library for JSON parsing. Managing these dependencies can be automated using Gradle. For example, Gradle can download the dependencies automatically, which is better than these alternatives:
-
Include those libraries in the repo (this bloats the repo size)
-
Require developers to download those libraries manually (this creates extra work for developers)
Appendix A: Product Scope
Target user profile:
-
NUS student from Computer Science, intending to specialise in Algorithms, Artificial Intelligence or Software Engineering
-
has taken many modules in NUS
-
prefers desktop applications over other types
-
can type fast
-
prefers typing over mouse input
-
is reasonably comfortable using CLI applications
Value proposition: Allow students to plan modules to take in future semesters and at the same time view module prerequisites and graduation requirements without having to refer to different webpages.
Appendix B: User Stories
Priorities: High (must have) - * * *, Medium (nice to have) - * *, Low (unlikely to have) - *
| Priority | As a … | I want to … | So that I can… |
|---|---|---|---|
|
student |
track the modules I am taking |
know what I need to complete my graduation requirement |
|
student |
see usage instructions |
refer to instructions when I forget how to use the App |
|
student |
add a module for the current semester |
keep track of all the modules I intend to take |
|
student |
delete a module |
remove modules that I am not taking |
|
student |
find a module by code, semester, grade or finished status |
locate details of modules without having to go through the entire list |
|
student |
view pre-requisites for a module |
take the pre-requisite modules ahead of time |
|
student |
add my modules in future semesters |
plan ahead |
|
student |
know my current CAP |
track my academic performance |
|
student |
predict my maximum and minimum CAP for graduation |
compare them against my current CAP and check my performance |
|
student |
check the total workload for each semester |
ensure an even distribution of workload across all semesters |
|
student |
see a recommended list of modules I can take in order of priority |
fulfil the graduation requirements on time |
|
student with many modules |
sort module by name |
locate a module easily |
{More to be added}
Appendix C: Use Cases
(For all use cases below, the System is GT (GradTrak) and the Actor is the Student, unless specified otherwise)
Use case: Initialising
MSS
-
Student starts GT.
-
GT loads courses, module information and modules taken.
-
GT loads loading screen.
Use case ends.
Use case: Adding to completed list of modules
Precondition: Student has already initialised GT
MSS
-
Student enters command to add modules with module code, semester completed and grades.
-
System records module code, semester completed and grades.
Use case ends.
Extensions
-
1a. Student enters invalid grade.
-
1a1. GT informs student that grade is invalid.
Use case resumes at step 1.
-
-
1b. Student enters invalid module code.
-
1b1. GT informs student that module code is invalid.
Use case resumes at step 1.
-
-
1c. Student enters invalid semester.
-
1c1. GT informs student that semester is invalid.
Use case resumes at step 1.
-
-
1d. Student enters module that is already in list of completed modules and same semester.
-
1d1. GT informs student that there is a repeat of module code.
Use case ends.
-
Use case: Delete module
Precondition: Student has already intialised GT
MSS
-
Student enters command to remove modules by keying in position in list.
-
System removes module from list of completed / planned modules.
Use case ends.
Extensions
-
1a. Student enters numbers that is 0, negative or exceeds the size of the list.
-
1a1. GT shows an error message.
Use case ends.
-
Use case: Modify details of modules taken
MSS
-
Student enters command to edit modules indicated by position on list and gives grades and semester taken / planning to take.
-
System edits relevant details.
Use case ends.
Extensions
-
1a. Number keyed in is 0, negative or exceeds size of list.
-
1a1. GT shows an error message.
Use case ends.
-
-
1b. Student enters invalid module code, invalid grade or invalid semester.
-
1b1. GT shows an error message.
Use case ends.
-
Use case: Set Semester Limit for a semester
MSS
-
Student enters a command to indicate the semester to set the limit as well as the limits to be set on the semester
-
System edits relevant details.
Use case ends.
Extensions
-
1a. Semester provided is invalid
-
1a1. GT shows an error message.
Use case ends.
-
-
1b. Limit provided is invalid.
-
1b1. GT shows an error message.
Use case ends.
-
-
1c. Limit provided is out of order, such that the minimum limit is more than the maximum limit.
-
1c1. GT shows an error message.
Use case ends.
-
Use case: Check limits
MSS
-
Student enters the command to check the current plan against their preferred semester limits
-
System analyses the current module plan to generate and display a report comparing the current plan against the semester limits.
Use case ends.
Use case: Display NUS module information
MSS
-
Student enters
displaymodto find an NUS module based on module code or keywords in the module title. -
System returns full module information.
Use case ends.
Use case: Recommend modules
MSS
-
Student enters
reccommand. -
System returns a list of module codes (with title) that the student is recommended to take.
Use case ends.
Use case: Find modules
MSS
-
Student enters
findcommand to search the module plan based on module code, semester, grade or finished status. -
System returns a list of modules in the module plan which satisfy the given parameters.
Use case ends.
Extensions
-
1a. Student enters
findwithout parameters.-
1a1. System gives an "invalid command format" message and provides the correct format.
Use case ends.
-
-
1b. Student enters an invalid grade or semester.
-
1b1. System rejects the command and provides the correct format for grade or semester.
Use case ends.
-
Use case: Display requirements
MSS
-
Student enters
displayreqcommand. -
System returns a list of course requirement along side their details and percentage of the requirement fulfilled.
Use case ends.
Use case: Change course of study
MSS
-
Student enters
studycommand with some course parameter. -
System changes course of study to course intended by student.
Use case ends.
Extensions
-
1a. Student enters
studywith courses not inside of GT.-
1a1. System informs student that no such course is available.
Use case ends.
-
-
1b. Student enters
studywithout parameter.-
1b1. System informs student of the right command format.
Use case ends.
-
Appendix D: Non Functional Requirements
-
Should work on any mainstream OS as long as it has Java
9or higher installed. -
Should be able to hold up to 1000
modulesTakenwithout a noticeable sluggishness in performance for typical usage. -
A user with above average typing speed for regular English text (i.e. not code, not system admin commands) should be able to accomplish most of the tasks faster using commands than using the mouse.
Appendix F: Instructions for Manual Testing
Given below are instructions to test the application manually.
| These instructions only provide a starting point for testers to work on; testers are expected to do more exploratory testing. |
F.1. Launch and Shutdown
-
Initial launch
-
Download the jar file and copy it into an empty folder.
-
Double-click the jar file
Expected: Shows the GUI with an empty module plan. The window size may not be optimum.
-
-
Saving window preferences
-
Resize the window to an optimum size. Move the window to a different location. Close the window.
-
Re-launch the app by double-clicking the jar file.
Expected: The most recent window size and location is retained.
-
F.2. Deleting a module
-
Deleting a module while all
moduleTakenare listed-
Prerequisites: List all
moduleTakenusing thelistcommand. -
Test case:
delete 1
Expected: First module is deleted from the list. Details of the deleted module are shown in the status message. Timestamp in the status bar is updated. -
Test case:
delete 0
Expected: No module is deleted. Error details are shown in the status message. Status bar remains the same. -
Other incorrect delete commands to try:
delete,delete x(where x is larger than the list size or negative)
Expected: Similar to previous.
-
F.3. Check completion of course requirements
-
Check what are the course requirement completed based on list of modules taken or planning to take
-
Prerequisite: Set the course to intended choice of study eg:
study Computer Science Artificial Intelligence, empty list of module taken -
Test case:
study Computer Science Algorithms,displayreq
Expected: Display all course requirements for the course Computer Science Algorithms -
Test case:
study Computer Science Algorithms,displayreqstudy Computer Science Artificial Intelligence,displayreq
Expected: Display all course requirements for course Computer Science Artificial Intelligence. -
Test case:
add GER1000 s/Y1S1,add GEQ1000 s/Y1S1,add GES1000 s/Y1S1,add GEH1000 s/Y1S1,add GET1000 s/Y1S1,displayreq
Expected: Display University Level Requirement is completed. -
Test case:
add GER1000 s/Y1S1,add GEQ1000 s/Y1S1,add GES1000 s/Y1S1,add GEH1000 s/Y1S1,add GEH1036 s/Y1S1,displayreq
Expected: Display University Level Requirement is not completed but at completion rate of 80%. -
Test case:
add GER1000 s/Y1S1,add GEQ1000 s/Y1S1,add GES1000 s/Y1S1,add GEH1000 s/Y1S1,add GEH1000 s/Y1S2,displayreq
Expected: Display University Level Requirement is not completed but at completion rate of 80%. -
Test case:
add CS3281 s/Y1S1,displayreq
Expected: Show that Software System Project Requirement not completed and has a completion rate of 50%. -
Other test cases to consider:
-
Duplicate modules in different semesters not double counted in requirement
-
Module that satisfy the same condition e.g. CS1010 and CS1101S can fulfil same condition, not double counted
-
Modules failed in previous semesters does not contribute in fulfilling requirement e.g.: current semester Y1S2, but failed a module in Y1S1. The failed module does not count towards any requirement.
-
-