Overview
GradTrak is an application that was created to aid students with their graduation requirements. NUS has multiple requirements
before its students can file for graduation and checking if all of the requirements have been met is a hassle for most
students.
Initially we were given a base code Address Book - Level 4 which
we had the choice of either morphing into something entirely different or enhance the current code. My team and I decided to
challenge ourselves and morph it into GradTrak.
My team and I had to complete the application within 6 weeks. The final products came out as intended with minor hiccups or problems.
Summary of Contribution
-
Major Feature: Added a search functionality that allows students to see all available NUS modules locally.
-
What it does: Users are able to search locally(without internet) all modules that are currently available in NUS. Users are allowed to search for modules that they interested in by the module’s code or even by searching for keywords found in the module’s name. Based on their search, a list of module/s will be presented to them. The information for each module also contains a prerequisite tree and a workload table so that students can also plan their modules semester by semester.
-
Why this feature: Knowing what modules are available is integral to graduate on time, instead of searching through the internet on what modules are available, bringing this feature to the user/students computer locally will greatly improve the efficiency at which students are able to plan and track their graduation.
-
Highlights: There are thousands of modules that need to be loaded during launch of the application and all of these information is stored in a JSON file
allModules.jsonwhich was obtained from moduleinformation. Further more a significant number of modules have a prerequisite tree which is crucial for students to see if they are eligible to read a particular module and this prerequisite tree was custom made as we could not find another data structure that fit the prerequisite tree.
-
-
Minor Enhancement: Designed and implemented a data structure called
ModuleTreewhich helps to display and check prerequisites, implemented a one-way read-only storage class to read theallModules.jsonfile. -
Code Contributed : [functional code] [Test code]
-
Code Contributions on Dashboard : Contributions
-
Other Contributions:
-
Project Management:
-
Set up Issue Tracker
-
Managed deadlines for team
-
-
Refactored Code
-
Refactored the storage class to read-only json files.
-
-
Documentation:
-
Did the README.adoc file and the initial UI mockUp
-
Modified sections of the UG and DG to match the application GradTrak.
-
-
UI:
-
Implemented a
panelhandlerso the panel changes with accordance to the command typed in.[PR here]
-
-
Contributions to the User Guide
Given below are sections I contributed to the User Guide which will show my ability to write to end-users who have no prior knowledge on programming. This section of the guide does not delve into the technical aspects of this application, only showing instructions on how to navigate through GradTrak. This sections shows how users can search for modules available in NUS currently and the limitations of this feature. |
Display module information: displaymod
The displaymod command shows all the modules that are available in NUS based on the search by the student. This command simply
shows modules straight from NUS’s database of modules and does not check if the student has met the prerequisites to read
a particular module.
This command will allow students to find out more about a module or even compare modules so as to decide which modules to read in the upcoming semesters. Once decided on which module the student plans to read, they can use [add] command to add the module to their own list.
| Searches are case-insensitive. |
Students must strictly adhere to syntax of the displaymod command in order to get optimum search results.
|
There are 2 ways to search for modules:
-
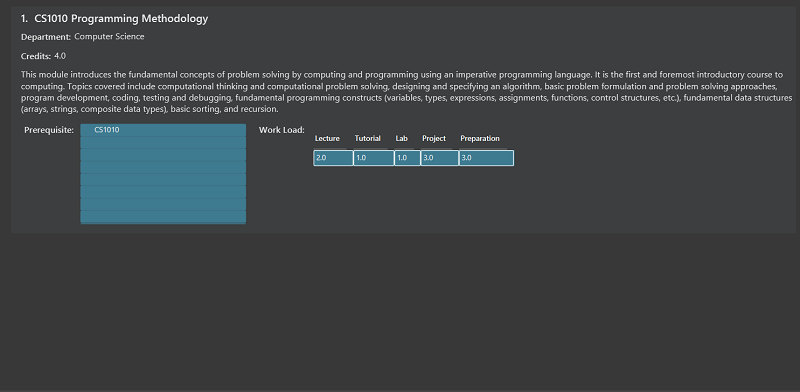
Search by code: All modules have module code associated with it, this makes it easier to remember modules.To search for modules based on code, a
c/prefix must be added afterdisplaymodcommand, followed by a list of modules which are separated by,.
Format: `displaymod c/MODULE_CODE,[MODULE_CODE]

The search above should yield a result:
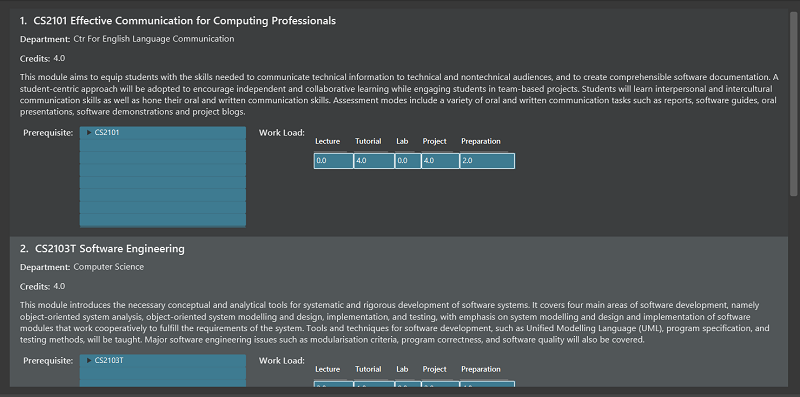
However if students wishes to search for multiple modules at once they can follow the example given below:

The search above should yield a result:
-
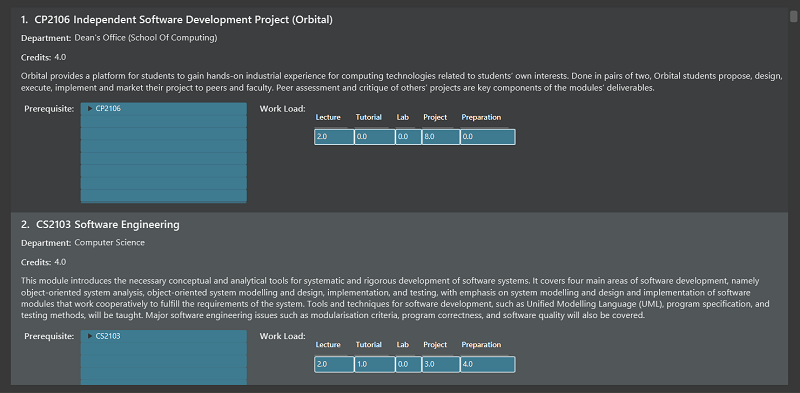
Search by name: There are cases where students may not remember or know the module code but vaguely remember the module name. Students who find themselves in such a situation can search for modules by their names by adding a
n/prefix after thedisplaymodcommand, followed by keyword/s that can be found in the module name. Keywords have to be separated by+symbol.
Format:displaymod n/KEYWORD+[KEYWORD]

The search above should yield a result:
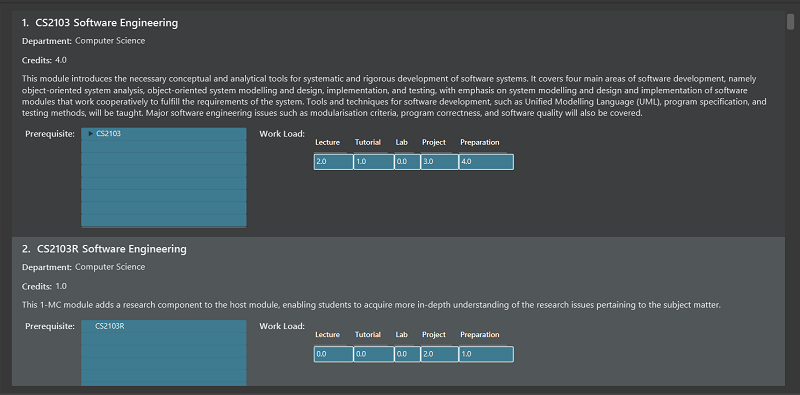
However if students wishes to search for multiple modules at once they can follow the example given below:

The search above should yield a result:
If the student has successfully managed to display a module of their choice, they will be presented with module/s containing several information that the student will find useful. The example below will show the information provided for each module after a successful search:

What each number displays:
1. Shows the module code and module name.
2. Shows which department the module belongs to.
3. Displays the amount of module credits a student can gain by reading this module.
4. Displays a brief description of the modules and potentially the topics that may be covered.
5. Contains the prerequisite tree for each module.
6. Contains workload load information, the values are meant to be read as Hours.
Contributions to the Developer Guide
Given below are sections I contributed to the Developer Guide, which is showcase my ability to write technical documentations.
This section will contain information on how the |
Storage component
Within the Storage component there are 2 types of storage classes:
1. read and write storage
2. read only storage
Read and write storage

API : Storage.java
The Storage component,
-
can save
UserPref,UserInfoobjects in json format and read it back. -
can save the GradTrak data in json format and read it back.
Read-only storage

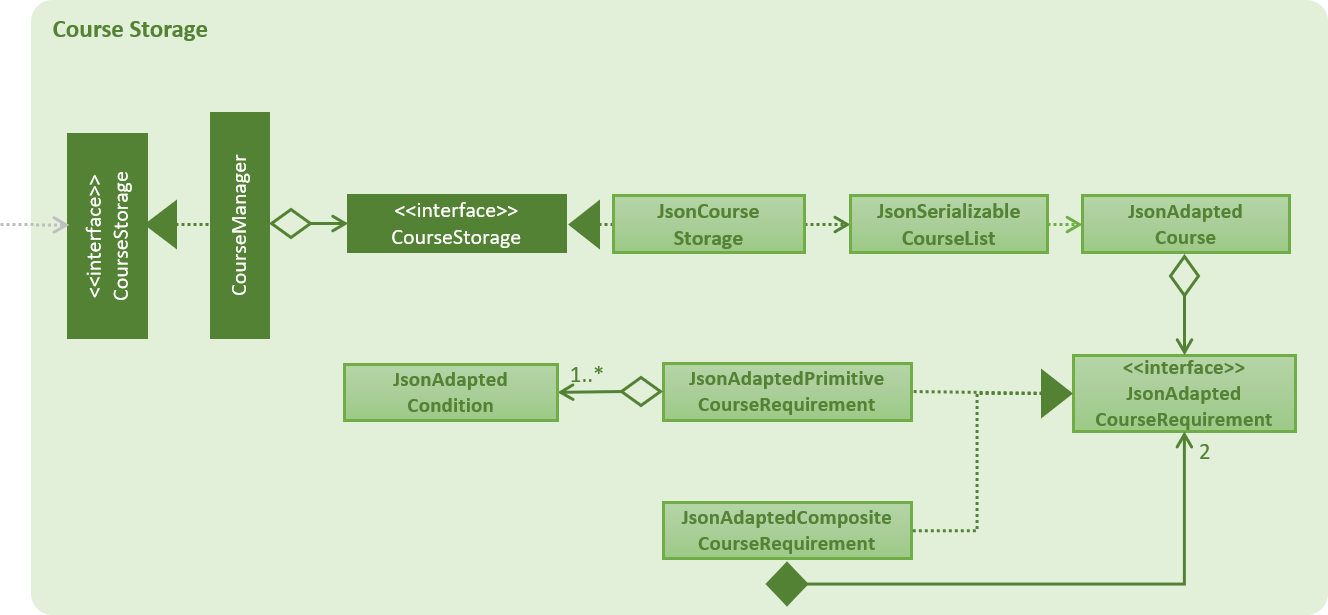
-
loads
ModuleInfoStorageandCourseStoragefrom json format into memory
Displaymod feature
Current implementation
displaymod is a command that displays the information of a module based on the search by the student. The main reason for implementing
such a feature is so that students can have immediate access to all available modules in NUS instead of searching through the
internet.
Creation of ModuleInfo
Most of the processing of this feature is done during the launch of the application. The modules are created as a object
called ModuleInfo. These objects only contain vital information of a particular module and nothing else. This to ensure that
only information relevant students are displayed. This process is done with aid of the Storage class, to be more exact
it uses [Read-Only] extracting all the data from allModule.Json file found in the resources folder.
The figure below shows the class diagram for ModuleInfo :
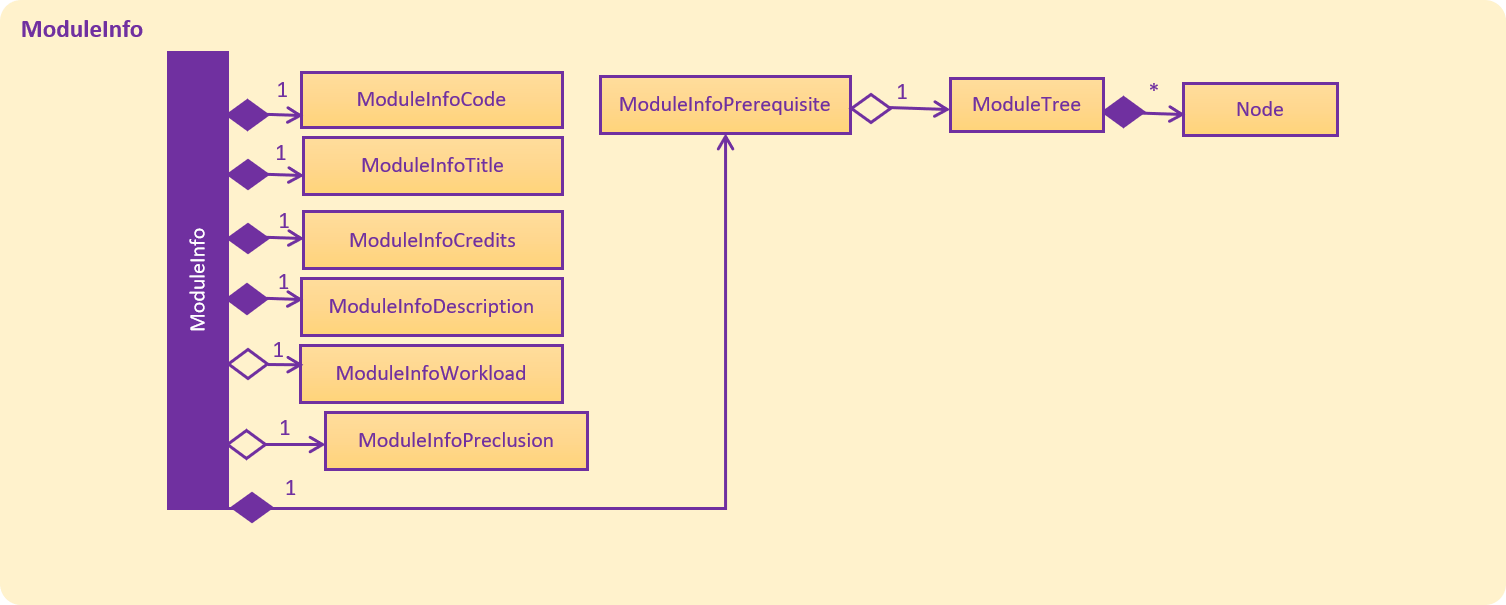
As seen from above the ModuleInfo class is made up of 8 other classes:
|
|
|
|
|
|
|
|
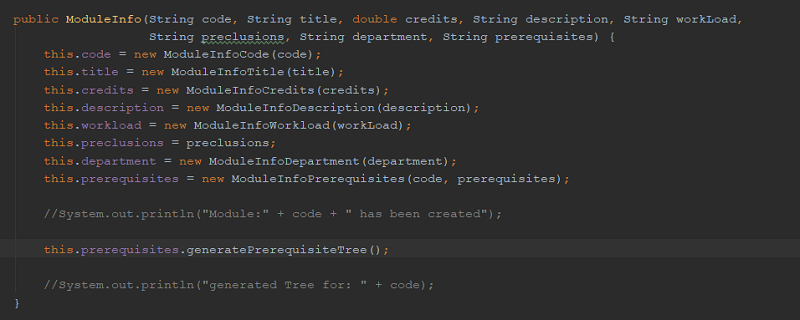
The information found in the modules are separated into their own class to maintain modularity in the
code. All of these objects are created in the construction of the ModuleInfo Object.
Generating prerequisite trees
Within the ModuleInfo class, the ModuleInfoPrerequisite class requires the most pre-processing. If a student wishes to take
a particular module, they have to check if they can satisfy the prerequisites, thus presenting the prerequisite tree is
paramount to the ModuleInfo class.
ModuleInfoPrerequisite contains a custom data structure called ModuleTree which can be found in the
commons.Util package. It was place in the commons package since it was a data structure and other functions
or feature may require the ModuleTree i.e. when adding/deleting modules from the ModuleTaken list of the student.
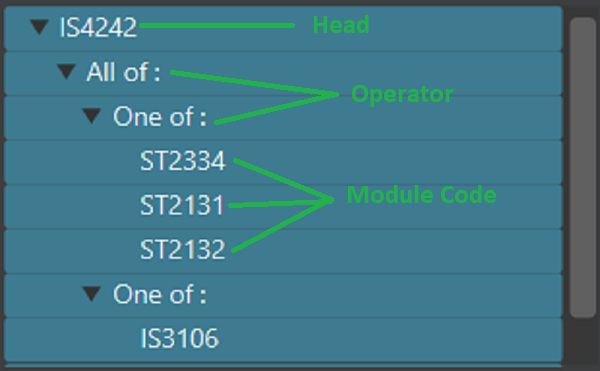
The ModuleTree data structure consist of "smaller" objects called Node, which can also be found in commons.Util.
Node can represent one of the following information:
1. Head : The head/root of the ModuleTree which holds a value of the module code of the "larger" ModuleInfo object.
2. Operator : Either "OR" or "AND" to indicate if only one of the module is required to fulfill the prerequisite or
all of the listed modules are required respectively.
3. Module Code : The module code that is required to meet the prerequisite.
The generatePrerequisiteTree() function is called after the ModuleInfoPrerequisite object has been created, since
the ModuleTree is dependent on the String input prereq which later be saved as prerequisiteString.
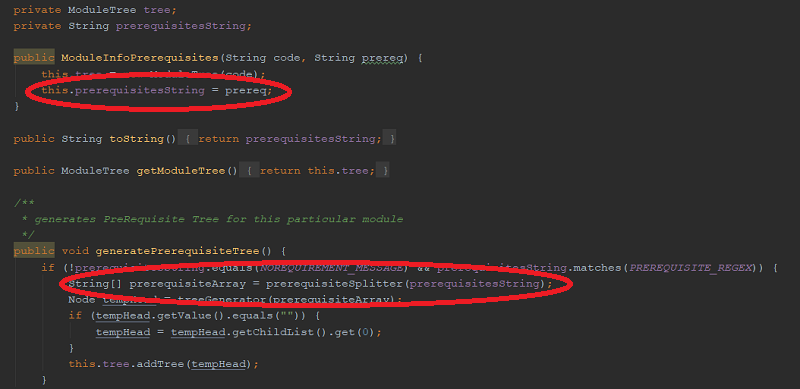
The input prerequisite usually comes in the format:
"Prerequisite":"[MA1312 or MA1521 or MA1505 or (MA1511 and MA1512)] and [ST2334 or ST2131 or ST2132] and [IS3106 or BT3103]"
The input value is then split into an array using regular expressions:
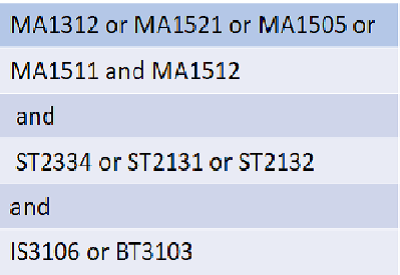
This helps with the arrangement of the ModuleTree as shown below:
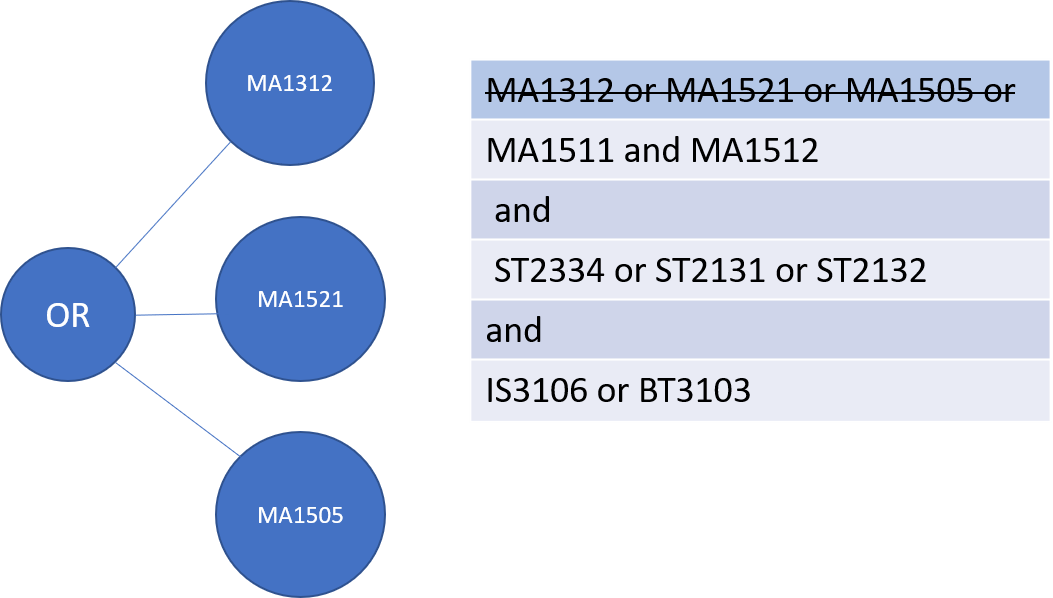
String is used to create a minor tree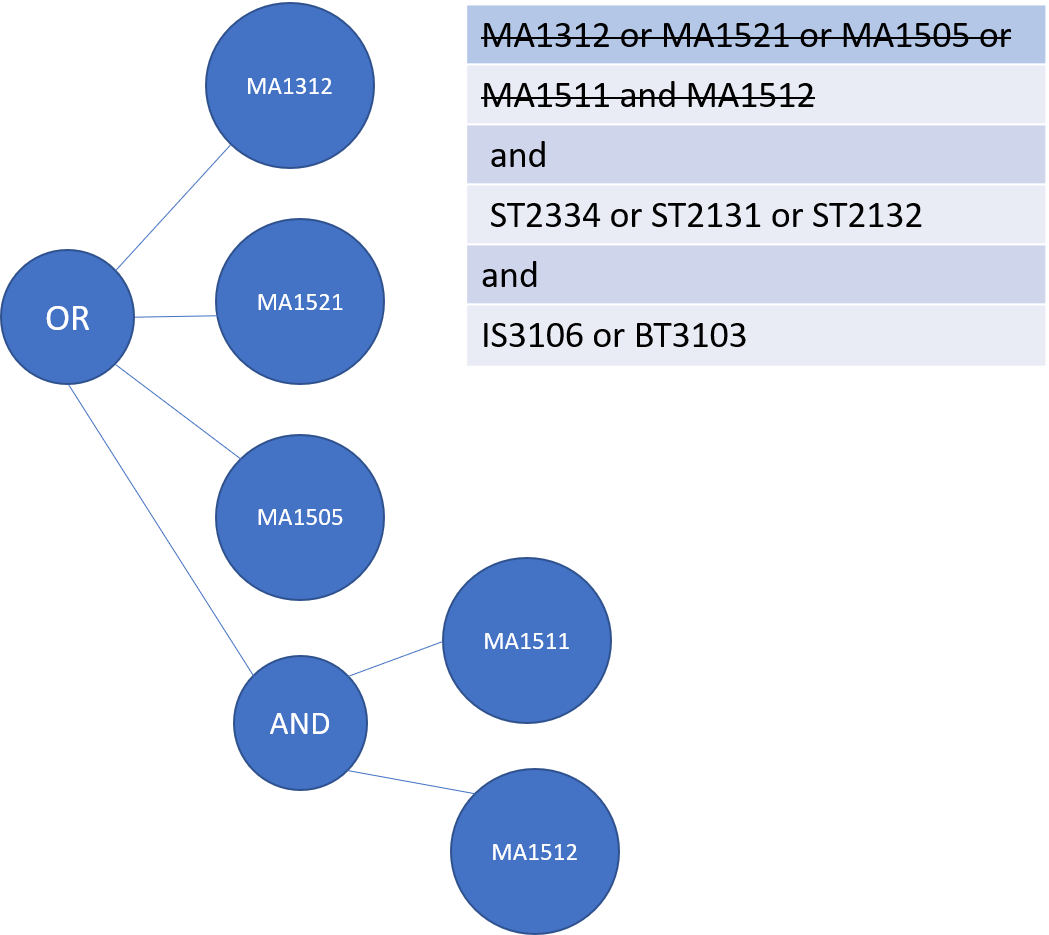
String ended with a "OR" the next String is made and added as a child to the predecessor.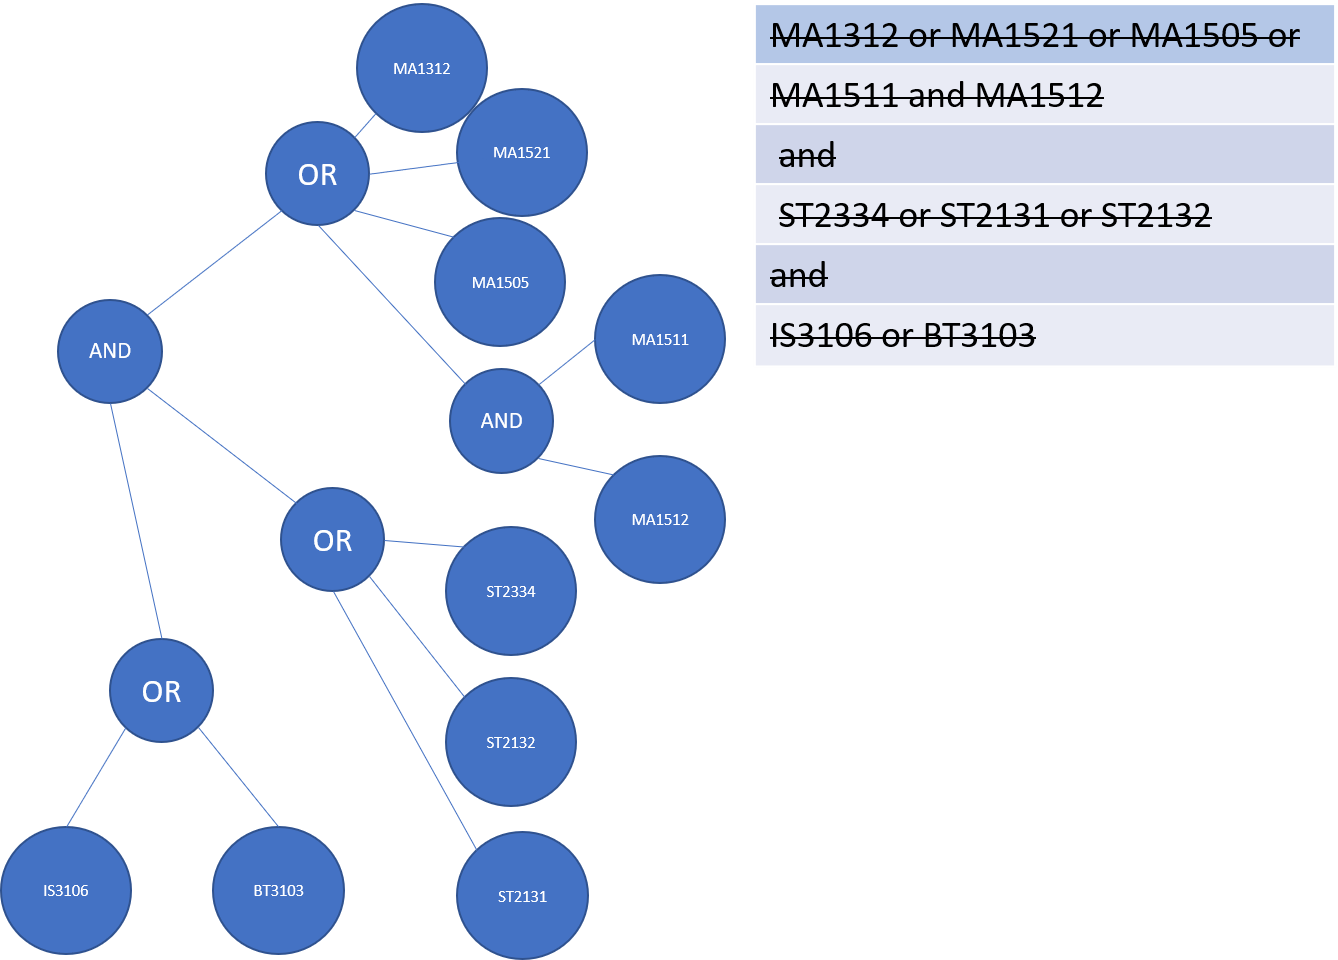
Making it into a list
The final part of this entire process is storing all the ModuleInfo objects into a list. Currently, we did this using
an ObservableList<>, this is done so that we can take advantage of the FilteredList<> class by filtering the list using
Predicates.
During initial launch, after each module’s information is converted into a ModuleInfo object, it will be added to a
ModuleInfoList object which contains an ArrayList<ModuleInfo>. After all the modules are added into ModuleInfoList,
ModuleInfoList will be passed into ModelManager and will be converted into an ObservableList<> called allModules.
Following that, a FilteredList<> object called displaylist will also be constructed from the allModules ObservableList<>.

Whenever the student searches for a particular ModuleInfo , the ObservableList<> is always ready and the FilteredList<>
will be updated using a Predicate List generated from the keywords searched by the student.

Design considerations
Aspect: ModuleTree data structure
-
Current implementation : Custom Module tree data structure
-
Pros: Able to handle "AND" or "OR" operations found in the prerequisite Tree.
-
Cons: Takes a extremely long time to implement and design. Not to mention extremely error-prone.
-
-
Alternative considered : Use a current
JDKTreedata structure-
Pros: Easy to deploy into current code base.
-
Cons: Unable to deal with special operations like "AND" or "OR".
-
Aspect: Storing ModuleInfo objects in an ObservableList<>
-
Current Implementation :
ObservableList<>is used-
Pros: Allows for
FilteredList<>to be used based on predicates; easy implementation. -
Cons: Requires additional classes to be implemented to handle the use of
Predicates.
-
-
Alternative considered: Sticking to
ArrayList<>-
Pros: Easy to handle as it is a simple data structure.
-
Cons: Harder to search for
ModuleInfoobjects based on codes and keywords.
-